Follower tutorial
Contents
- 1 Simple Follower Creation
- 2 Advanced Follower Creation
- 3 Common Follower Problems & FAQ
Simple Follower Creation
Follow these steps to create a follower that
- Levels up with a default package
- Can be chosen from the party picker
- Can gain XP
This guide assumes you know how to create a creature and are comfortable with basic scripting.
You should only use this simple method if you are sure there will be empty space in the active party when your follower is recruited.
Create the creature
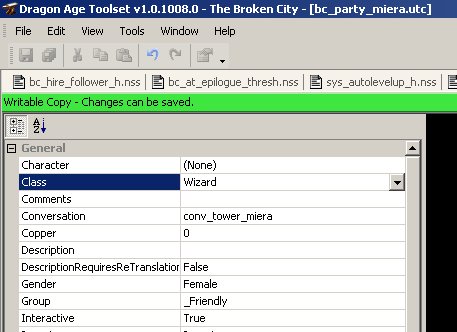
Create a creature to act as your follower. Set its name, appearance, gender, head morph, conversation, inventory etc as you want them to behave in-game.
Set an appropriate Tag (you'll be using it a lot). I suggest "party_charname".
Make sure you choose a Class. For most followers this should be Rogue, Warrior or Wizard.
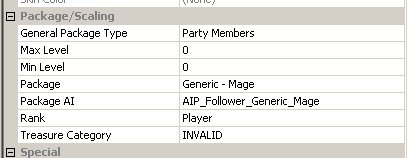
Under Package/Scaling set:
General Package Type to be Party Members
Package to be an appropriate value (probably "Generic - Wizard" or similar)
Package AI (there should only be one choice)
Rank to be Player
Save and export your character as normal.
Override char_stage
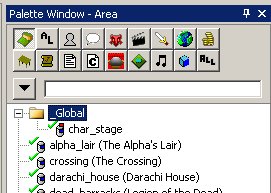
In your resource palette, open char_stage under the Global folder:
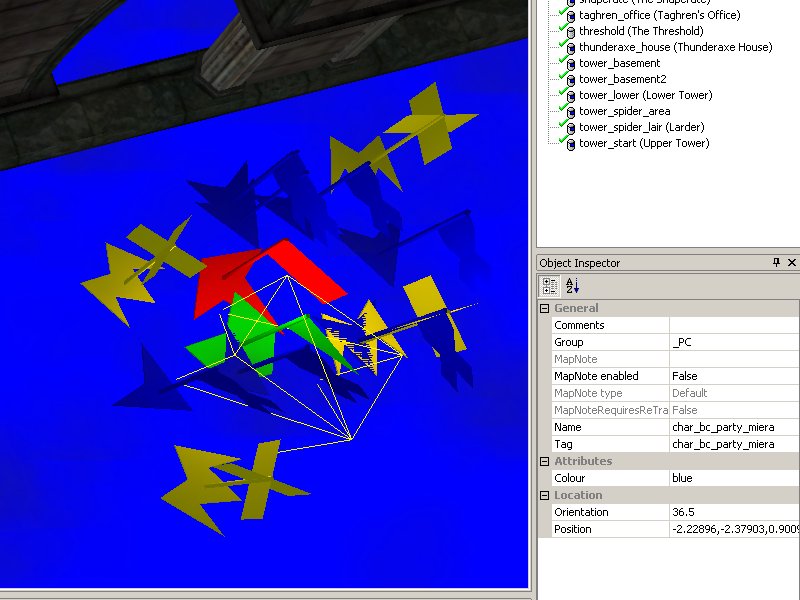
Create a new waypoint for your follower to appear on the party picker. This waypoint must have a tag in the form of "char_" followed by the exact tag of your follower.
In this example the tag of my follower is bc_party_miera so her waypoint tag must be char_bc_party_miera
For a standalone module (such as in this example), put your waypoint wherever you please. The illustrated one is directly on top of Morrigan's. For an add-in to the main campaign, you should position your wp appropriately relative to the core party members.
Save and export the area.
Move the char_stage.are and char_stage.lst files from your core export folder to your module's export folder (probably from \Documents\Bioware\Dragon Age\packages\core\override\toolsetexport to \Documents\Bioware\Dragon Age\AddIns\yourModule\module\override\toolsetoverride). This ensures that the modification to the character stage only takes effect if your module is installed and enabled, which will help manage compatibility problems. Make sure those files are included when you package your module for distribution.
Create m2DAs for the Party Picker
You will need to create two Excel spreadsheets.
The first should be named (both worksheet and file) partypicker_ with a unique suffix. In this example, my first spreadsheet is named partypicker_fofbc.xls with a worksheet name of partypicker_fofbc - the suffix being the acronym of my module.
Set up your columns as follows:
The ID for your follower must be 12 or higher. 11 is the highest value used in the base 2DA. 12 is fine for standalone modules, add-ins will probably want to use an arbitrarily high number to avoid potential conflicts.
The Label should be the follower's name as you wish it to appear on the party picker.
The Tag must be your follower's tag.
All other values are non-functioning defaults and should be specified as in the image above unless you know explicitly what you're doing.
The second spreadsheet should be named party_picker_ (note middle underscore). Once again append your unique suffix (in this example party_picker_fofbc.xls with party_picker_fofbc as its worksheet).
Set up your columns and data like so:
ID and Tag should match what you did in the first spreadsheet. Specify INVALID COLUMN for the third column.
If you're familiar with m2DAs, generate them from these files, copy them to your module's override directory, and skip to the next step. Otherwise, read on:
- Go to \Program Files\Dragon Age\tools\ResourceBuild\Processors (or wherever you installed Dragon Age)
- Copy ExcelProcessor.exe from that folder to whichever folder has the excel sheets you just created.
- Drag and drop your xls files onto ExcelProcessor. This will create .gda files.
- Copy these .gda files to your module's export directory (probably \Documents\Bioware\Dragon Age\AddIns\yourModule\module\override\toolsetoverride). Make sure they are included in your .dazip when the time comes to build your module.
If you are an OpenOffice user and have trouble with ExcelProcessor, you can use GDApp to directly create the 2DAs. It rocks!
Capture the EVENT_TYPE_PARTYMEMBER_ADDED Event
Amusingly enough, the Party Picker does not actually add followers to the party. However it raises an event that allows you to do so. Your module script needs to capture this event and execute some code.
The following example shows what to do with the event. The full script would work as a module script for an add-in (assuming it didn't need to do anything else), but otherwise you'll have to incorporate the event into your own script:
#include "utility_h"

void main()
{
    event ev = GetCurrentEvent();
    int nEventType = GetEventType(ev);
    switch(nEventType)
    {
        case EVENT_TYPE_PARTYMEMBER_ADDED:
        {
            object oFollower = GetEventObject(ev, 0);
            SetLocalInt(oFollower, CREATURE_REWARD_FLAGS, 0);  //Allows the follower to gain XP
            SetFollowerState(oFollower, FOLLOWER_STATE_ACTIVE);  //Adds follower to the active party
            break;
        }

    }
}
SetFollowerState(oFollower, FOLLOWER_STATE_ACTIVE) is the key statement to add the follower to the active party. You must have this.
SetLocalInt(oFollower, CREATURE_REWARD_FLAGS, 0) is a bug-fix, as followers hired with UT_HireFollower() do not receive XP by default. This statement fixes that, and I consider it best practice to keep it in this event to ensure it is always set. You will not wish to do this if you want a follower that should not gain XP to be on the party picker.
Note that you do not need to intercept the corresponding event for a party member being removed - the party picker handles spawning/despawning, and thus will successfully remove members.
Remember to save and export your module script.
Create Your Hiring Script
Now all that remains is to actually hire the follower :)
Create a script to handle the hiring (which will most likely be fired from a conversation). The script is quite simple:
#include "utility_h"

void main() {

        object oFollower = GetObjectByTag("bc_party_miera"); //Use CreateObject() if the creature isn't present in the module yet

        UT_HireFollower(oFollower);   //Hires the follower

        SetPartyPickerGUIStatus(2);

        ShowPartyPickerGUI();  //Shows the Party Picker; necessary for the follower to gain XP

}
Make sure you use your own follower's tag and not the example one :)
This script fires the party picker after hiring the follower. That is absolutely necessary via this method, as we have put the XP fix onto an event fired by the party picker. You cannot put the XP fix into this script, it must be called from a later one (the bug is caused by an errant call to an event in player_core, which will be executed AFTER this script).
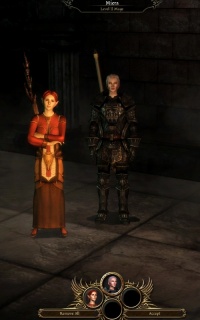
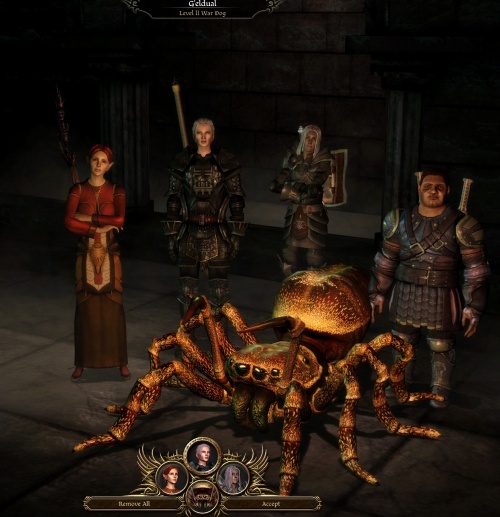
If everything worked, you should see something like this:
Advanced Follower Creation
Follow these steps to have full control over the creation of your follower, with options such as:
- Unique level-up template
- Class and specialisation chosen via script
- Any starting state
- Level higher than the PC
- Starts with a specialisation point rather than a specific specialisation
- Set plot flags in the call to the hire script
Prepare Creature, char_stage and Party Picker m2DAs
Follow the same steps to create your create your follower creature, override char_stage and create your Party Picker m2DAs as above.
Create Party Plot
While not necessary, it's very helpful to have plot flags set when a follower is hired or joins/leaves the active party. This makes conversation interjections and the like very easy.
Create a plot with appropriate flags. There's no real need to associate journal text with them:
Add Plot Flags to Party Picker Event Intercept
We then update our module script to make use of that plot, like so:
#include "utility_h"
#include "wrappers_h"
#include "plt_bc_create_party"   //make sure you include your own plot, not mine

void main()
{
    event ev = GetCurrentEvent();
    int nEventType = GetEventType(ev);
    switch(nEventType)
    {
        case EVENT_TYPE_PARTYMEMBER_ADDED:
        {
            object oFollower = GetEventObject(ev, 0);
            SetLocalInt(oFollower, CREATURE_REWARD_FLAGS, 0);
            SetFollowerState(oFollower, FOLLOWER_STATE_ACTIVE);

            if (GetTag(oFollower) == "bc_party_miera") {               //You must explicitly test for your follower's tag.
                WR_SetPlotFlag(PLT_BC_CREATE_PARTY, PARTY_MIERA_IN_PARTY, TRUE);     //Make sure you use your own flags!
            }

            break;
        }

        case EVENT_TYPE_PARTYMEMBER_DROPPED:
        {
              object oFollower = GetEventObject(ev, 0);

              if (GetTag(oFollower) == "bc_party_miera") {
                WR_SetPlotFlag(PLT_BC_CREATE_PARTY, PARTY_MIERA_IN_PARTY, FALSE);     //As above, but set false.
              }

        }

    }
}
Create a Level Up Template
You can skip this step if you're content to use one of the generic Rogue, Wizard or Warrior templates, but I don't recommend it. Making a template that suits your character is easy and will almost always be better for the player than a generic one that spends points poorly.
Go to \Program Files\Dragon Age\tools\Source\2DA (or wherever you installed Dragon Age).
You should see a number of excel sheets of the form ALCharacter.xls (such as ALAlistair.xls, ALLeliana.xls, ALRogue_Default.xls etc). Open the one closest to your character (ie Morrigan or Wynne for a wizard, Leliana or Zevran for a rogue). Save a copy as ALYourcharacter.xls in whatever directory you're using to create your 2DAs, remembering to rename the worksheet ALYourcharacter (in this example, ALMiera.xls with ALMiera as its worksheet).
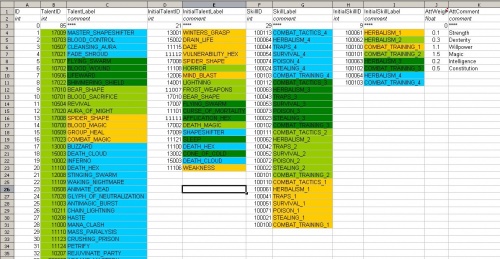
It should look something like this:
Columns B and C are the talents/spells available to this character. Do not change them.
Columns F and G are the skills available to this character. Do not change them.
We will edit the remaining columns like so:
Setting Stat Weights
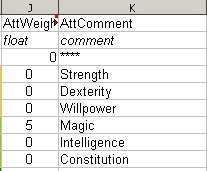
The stat weights in column J determine how the follower will spend their attribute points, in a rough ratio. So if Dexterity is set to 1.5 and Intelligence to 1, you should expect to see 3 points of Dex for every 2 points of Cunning in-game (note Intelligence is the label used in the toolset for Cunning).
Simply change the values in J to reflect how you'd like the character to spend their points. In this example we're creating a wizard, so we're not going to mess around:
This character will only raise magic. I set the value to 5 rather than something like 1 to provide room underneath for the other stats while still overwhelmingly favouring magic, but in practice I only really ever want that one stat.
Setting Talent and Skill Priorities
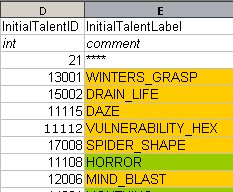
Columns D and E are the talents/spells that the character will buy, in preference order from top to bottom.
Columns H and I are the skills available to this character, in preference order from top to bottom.
To change these, just copy the appropriate two cells from columns B&C or F&G over the ones you want to replace.
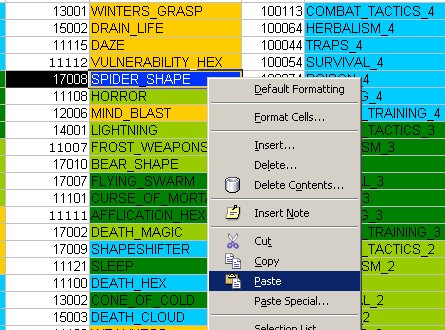
For example, here we're copying Morrigan's template. Morrigan has Spider Shape high in her preferences, which we do not want.
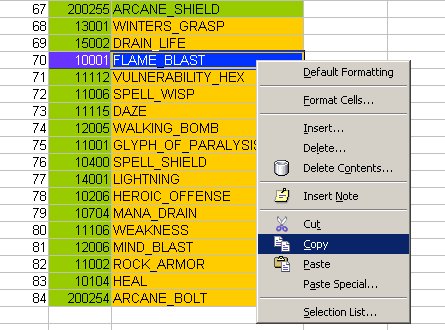
We decide we'd prefer Flame Blast, so we find it in columns B&C and copy both cells:
Then we select the cells we want to replace in columns D&E and paste over them:
Continue this process until your priorities list for both skills and talents/spells is exactly as you want it. Make sure you have at least as many priorities as the core follower you're copying - points that cannot be spent according to these priorities have a habit of vanishing.
If you used any abilities from a specialisation, make sure you remember to set that specialisation with the function we'll introduce later. The autolevel scripts will add specialisation abilities to a character regardless of whether they have that spec or not.
Create a M2DA_base_ m2DA
Dragon Age will need to know where to find your autolevel template. We tell it by extending M2DA_base.gda
Create a spreadsheet with the name and worksheet name in the form M2DA_base_ with your unique suffix (in this example, M2DA_base_fofbc.xls with M2DA_base_fofbc as a worksheet).
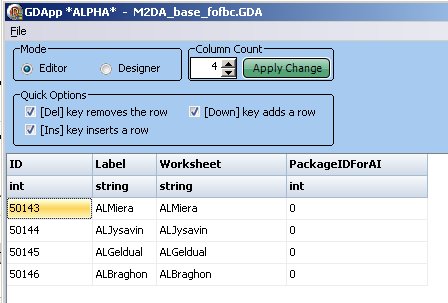
Set up its columns and data like so (note I used GDApp because Open Office wasn't cooperating for this one!):
The ID should be very high to avoid conflicts. I've arbitrarily chosen 50,000+ here. Carefully note the ID you've chosen for your character, you will need it later.
Set the Label and Worksheet to be the name of your autolevel template worksheet (ALCharactername if you've been following this).
Set the PackageIDForAI to be 0, it shouldn't be needed for followers.
When you're done, use ExcelProcessor to make GDAs of both spreadsheets and copy them to your module's export folder.
Create a New Hire Function Include
Many vital steps of follower addition happen inside an event in player_core. Followers tend to be extremely buggy (no skill tree, for example) if this event does not fire.
However, that event is not very flexible. In order to control it to our requirements, we need to replicate its functionality inside our own script. This is probably much safer than messing with player_core directly!
Create a new script file, naming it something like hireCustomFollower_h. We will be including this wherever we want to hire a follower.
Paste in the following script:
#include "sys_chargen_h"
#include "wrappers_h"
#include "utility_h"
#include "sys_rewards_h"
#include "approval_h"
#include "sys_autolevelup_h"

/*  Jye Nicolson 5-Jan-2010


This function set duplicates the full functionality chain of UT_HireFollower, with the following exceptions:

-  Followers can gain XP
-  Autolevel status can be set (default off)
-  Followers can be set to any starting state (default Available) and will still be properly initalised and added to the party pool
-  Autolevel tables for non-core followers can be explicitly set.
-  Class and Specialisation can be chosen via script
-  Followers without specialisations are granted a spec point by default.

It should only ever be called once each for characters you intend to be full followers.
Much of the protective code handling summoned creatures etc. in player_core is not present here.


Calling the function:


Simple:

hireCustomFollower(oFollower, CLASS_WARRIOR);

Change the class to CLASS_WIZARD or CLASS_ROGUE as appropriate.
This will hire your follower and make them available.
They will auto level up with a default package, and receive a free spec point.


Best Practice:

hireCustomFollower(oFollower, CLASS_WARRIOR, PLT_YOUR_PARTY_PLOT, YOUR_FOLLOWER_JOINED_FLAG, ABILITY_TALENT_HIDDEN_CHAMPION);

Where the plot and flag are those for your module (remember to create the plot and include it on the calling script), and ABILITY_TALENT_HIDDEN etc is the desired spec.

You should also have a custom ALTable set up.
See wiki for details, and remember to edit it in to GetCustomFollowerALTable below or pass it directly as an argument to hireCustomFollower.


Full argument list:


void hireCustomFollower (
        object oFollower,   //Pass your follower object, mandatory

        int nForceClass,    //Pass a Class constant here, usually CLASS_ROGUE, CLASS_WARRIOR, CLASS_WIZARD.  Mandatory due to a bug.

        string sPlot = "",   //It's recommended you have a plot flag to be set when the follower joins.  Pass the plot constant here.  Remember to #include in calling script

        int nPlotFlag = "",  //And then pass the flag constant.  Will be set to TRUE if available.

        int nForceSpec = 0,  //This is the ID of the Specialisation you want.  Note they are NOT classes, but abilities.  The full list is:
                             //ABILITY_SPELL_HIDDEN_ARCANE_WARRIOR, ABILITY_SPELL_HIDDEN_BLOODMAGE, ABILITY_SPELL_HIDDEN_SHAPESHIFTER, ABILITY_SPELL_HIDDEN_SPIRIT_HEALER
                             //ABILITY_SPELL_HIDDEN_BARD, ABILITY_TALENT_HIDDEN_ASSASSIN, ABILITY_TALENT_HIDDEN_DUELIST, ABILITY_TALENT_HIDDEN_RANGER
                             //ABILITY_TALENT_HIDDEN_BERSERKER, ABILITY_TALENT_HIDDEN_CHAMPION, ABILITY_TALENT_HIDDEN_REAVER, ABILITY_TALENT_HIDDEN_TEMPLAR
                             //I recommended forcing a spec, particularly if your ALTable includes abilities from one.

        int nALTable = 0,    //This is the ID of an ALTable from 2DA_base.GDA or your module's m2DA_base_*.GDA  I recommended the latter, but you can edit that into GetCustomFollowerALTable below rather than passing it.

        int bInvokePicker = FALSE,  //Sets whether the party picker should be opened on hiring.  I think it's cleaner to call the picker outside this script, particularly if you have multiple hires at once.

        int nInitialState = FOLLOWER_STATE_AVAILABLE,  //This sets whether the follower joins the active party or not.  Options are:
                                                       //FOLLOWER_STATE_ACTIVE (put them in the active party)
                                                       //FOLLOWER_STATE_LOCKEDACTIVE (force them into the active party and keep them there, remember to change this later.
                                                       //FOLLOWER_STATE_AVAILABLE (make them available on the party picker (if you've set it up for them), but not in the active party)
                                                       //Plus some others you're unlikely to need at this time.  Defaults to AVAILABLE because having 4+ active followers is screwy.

        string sCurrPlot = "",  //If you set FOLLOWER_STATE_ACTIVE or FOLLOWER_STATE_LOCKEDACTIVE, the script will check to see if you passed this.
                                //It is recommended that you have a plot flag set for a given follower being in the active party, this makes conversation interjection etc. much easier.

        int nCurrPlotFlag = 0,  //This flag will be set if FOLLOWER_STATE_ACTIVE or FOLLOWER_STATE_LOCKEDACTIVE are true
                                //AND sCurrPlot has a value AND nCurrPlotFlag is > 0.
                                //ie if you added someone to the active party and have a plot flag to cope with it.

        int nAutolevel = 0,     //Sets the Autolevel flag on the character sheet.  0 is off, 1 is on, 2 forces it on and removes it so the player can't turn it off.


        bFreeSpecPoint = TRUE,  //This grants a specialisation point to the follower if they do not have a specialisation.
                                //It's important to set this false for classes that do not have specs, such as CLASS_DOG.

        int nTargetLevel = 0,   //If you want a specific level, set this.  Generally not worthwhile unless you set it higher than the player, since they'll just get XP from the party picker anyway.

        int nMinLevel = 0       //Set this if there's a specific level you don't want the follower to go below.  Probably only useful if the PC might be very low level but not necessarily so.

        )


*/


/* GetCustomFollowerALTable()

This function is where you put your custom table assignments.

You should explicitly test for the tag of your follower (not mine!) and assign a value to nTable from your m2DA extension to M2DA_base

See wiki for details on how to do this, or ignore it to get the default Warrior/Rogue/Wizard AL tables.

NOTE: you MUST explicitly set a table for non-Warrior/Rogue/Wizards, eg dogs.  Use TABLE_AL_DOG for a default Mabari.

*/

int GetCustomFollowerALTable(object oFollower) {
    int nTable = _GetTableToUseForAL(oFollower);

    if (GetTag(oFollower) == "bc_party_miera") {
        nTable = 50143;
    }

    if (GetTag(oFollower) == "bc_party_jysavin") {
        nTable = 50144;
    }

    if (GetTag(oFollower) == "bc_party_geldual") {
        nTable = 50145;
    }

    if (GetTag(oFollower) == "bc_party_braghon") {
        nTable = 50146;
    }

    return nTable;

}


// This just cleans up the main function a little

int GetCustomFollowerTargetLevel(object oFollower, object oHero, int nPackage, int nMinLevel = 0) {
            int nPlayerLevel = GetLevel(oHero);
            int nTargetLevel = 0;

            if((nPlayerLevel >= 13) || (nPlayerLevel == 1) || (!_UT_GetIsPlotFollower(oFollower))) {
               nTargetLevel = nPlayerLevel;
            } else {
               nTargetLevel = nPlayerLevel + 1;
            }

            if (nMinLevel == 0) {  //If nMinLevel is not specified, checks package 2DA for a value
              nMinLevel = GetM2DAInt(TABLE_PACKAGES, "MinLevel", nPackage);
             }
            if(nMinLevel > 0 && nMinLevel > nTargetLevel) {
               nTargetLevel = nMinLevel;
            }

            return nTargetLevel;

}

// Moving this black box out :)  I don't really understand it, but it should function if you have tactics set up in a package.

void InitCustomFollowerTactics(object oFollower, int nPackage) {
         int nTableID = GetM2DAInt(TABLE_PACKAGES, "FollowerTacticsTable", nPackage);
         if (nTableID != -1)
            {
             int nRows = GetM2DARows(nTableID);
             int nMaxTactics = GetNumTactics(oFollower);

             int nTacticsEntry = 1;
             int i;
             for (i = 1; i <= nRows && nTacticsEntry <= nMaxTactics; ++i)
                {
                        int bAddEntry = FALSE;
                        int nTargetType = GetM2DAInt(nTableID, "TargetType", i);
                        int nCondition = GetM2DAInt(nTableID, "Condition", i);
                        int nCommandType = GetM2DAInt(nTableID, "Command", i);
                        int nCommandParam = GetM2DAInt(nTableID, "SubCommand", i);

                        int nUseType = GetM2DAInt(TABLE_COMMAND_TYPES, "UseType", nCommandType);
                        if (nUseType == 0)
                        {
                            bAddEntry = TRUE;
                        }
                        else
                        {
                            bAddEntry = HasAbility(oFollower, nCommandParam);
                        }

                        if (bAddEntry)
                        {
                            SetTacticEntry(oFollower, nTacticsEntry, TRUE, nTargetType, nCondition, nCommandType, nCommandParam);
                            ++nTacticsEntry;
                        }
                    }
                }
}


/* InitCustomFollowerSpec:

This function tries to set the forced Specialisation.  If there is none, it checks the package for one.

If there isn't either of those, it grants a free spec point if bFreeSpecPoint is true.

*/

void InitCustomFollowerSpec(object oFollower, int nPackage, int nForceSpec, int bFreeSpecPoint) {
    // Find specialization, and optionally add a spec point if none is found.

        if (nForceSpec == 0) {

        int nSpecAbility = GetM2DAInt(TABLE_PACKAGES, "switch1_class", nPackage); // followers can have only 1 advanced class
         if(nSpecAbility > 0)
         {
          AddAbility(oFollower, nSpecAbility);
         } else {
             if (bFreeSpecPoint) {
                 SetCreatureProperty(oFollower, 38, 1.00);
             }
         }

        } else {

             AddAbility(oFollower, nForceSpec);

        }
}


/* hireCustomFollower()  (See doco at top of page)

I strongly suggest you reorder the parameters if you're adding many followers with advanced options.

Feel free to leave them alone if you only want to set class, plot, spec or don't mind long declarations.

Note nForceClass is currently compulsory due to flakiness with GetCreatureCoreClass()


*/


void hireCustomFollower(object oFollower, int nForceClass, string sPlot = "", int nPlotFlag = 0, int nForceSpec = 0, int nALTable = 0, int bInvokePicker = FALSE, int nInitialState = FOLLOWER_STATE_AVAILABLE, string sCurrPlot = "", int nCurrPlotFlag = 0, int nAutolevel = 0, int bFreeSpecPoint = TRUE, int nTargetLevel = 0, int nMinLevel = 0) {

        object oHero = GetHero();

        /* #################  BEGIN BASIC FOLLOWER JOIN BLOCK   ###################

        This loosely replicates WR_SetFollowerState.


        */

        if (nForceClass == 0) {
            nForceClass = GetCreatureCoreClass(oFollower);           //This is not working.  Hence nForceClass mandatory.
        }


        SetGroupId(oFollower, GetGroupId(oHero));      //Puts the follower in the pc's Group.
        SetEventScript(oFollower, RESOURCE_SCRIPT_PLAYER_CORE);  //This makes them act like a player.
        SetFollowerState(oFollower, nInitialState);  //This sets whether they are available, in the active party etc.


        /* #################  END BASIC FOLLOWER JOIN BLOCK ##################### */


        /* #################  BEGIN PLAYER_CORE EVENT_TYPE_PARTY_MEMBER_HIRED EMULATION #################

         This replicates the EVENT_TYPE_PARTY_MEMBER_HIRED handler from player_core, stripped down for simplicity and allowing our custom options.


        */

        Chargen_EnableTacticsPresets(oFollower);    //I assume this is important.

        SetLocalInt(oFollower, FOLLOWER_SCALED, 1);  //This should prevent the follower being rescaled by player_core or what have you

        int nPackage = GetPackage(oFollower);  //Gets the package, which will be used to find a number of 2DA IDs.
        int nPackageClass = GetM2DAInt(TABLE_PACKAGES, "StartingClass", nPackage);  //I don't think this is used, even by player_core


        // set behavior according to package
        int nBehavior = GetM2DAInt(TABLE_PACKAGES, "FollowerBehavior", nPackage);

        if(nBehavior >= 0) {
            SetAIBehavior(oFollower, nBehavior);
        }


        Chargen_InitializeCharacter(oFollower);      //We initialise the follower and choose race/class.

        Chargen_SelectRace(oFollower,GetCreatureRacialType(oFollower));
        Chargen_SelectCoreClass(oFollower,nForceClass);


         if (nTargetLevel == 0) {   //This block picks a target level if not specified

              nTargetLevel = GetCustomFollowerTargetLevel(oFollower, oHero, nPackage, nMinLevel);
         }

         int nXp = RW_GetXPNeededForLevel(Max(nTargetLevel, 1));      //Here is where the XP is calculated and rewarded
         RewardXP(oFollower, nXp, FALSE, FALSE);


         // -------------------------------------------------------------
         // add hidden approval talents - (JN: I don't know how to set these yet, but when I figure it out this should make it work)
         // -------------------------------------------------------------
         int nIndex = Approval_GetFollowerIndex(oFollower);
         Approval_AddFollowerBonusAbility(nIndex, 0);


          //Handle Specialisation
          InitCustomFollowerSpec(oFollower, nPackage, nForceSpec, bFreeSpecPoint);


         // -------------------------------------------------------------
         // This spends all available attribute and stat points on the
         // creature according to the levelup table.  (JN:  this replicates AL_DoAutoLevelUp but with our choice of table)
         // -------------------------------------------------------------

         if (nALTable == 0) {
            nALTable = GetCustomFollowerALTable(oFollower);
         }

         AL_SpendAttributePoints(oFollower, nALTable, FALSE);
         AL_SpendSkillPoints(oFollower, nALTable, TRUE);
         AL_SpendSpecializationPoints(oFollower, nALTable);
         AL_SpendTalentSpellPoints(oFollower, nALTable, TRUE);

        // -------------------------------------------------------------------------
        // Update various UIs
        // -------------------------------------------------------------------------
        Chargen_SetNumTactics(oFollower);
        SetCanLevelUp(oFollower,Chargen_HasPointsToSpend(oFollower));


        // load tactics
         InitCustomFollowerTactics(oFollower, nPackage);

         /* #################  END PLAYER_CORE EVENT_TYPE_PARTY_MEMBER_HIRED EMULATION ################# */


         SetAutoLevelUp(oFollower, nAutolevel);         //This is the autolevel flag on the character sheet.

         //Set plot flags

         if (!((sPlot == "") || (nPlotFlag == 0))) {           //Joined Party
            WR_SetPlotFlag(sPlot, nPlotFlag, TRUE);
         }

         if ((nInitialState == FOLLOWER_STATE_ACTIVE) || (nInitialState == FOLLOWER_STATE_LOCKEDACTIVE)) {
            if (!((sCurrPlot == "") || (nCurrPlotFlag == 0))) {
                WR_SetPlotFlag(sCurrPlot, nCurrPlotFlag, TRUE);   //Currently in Party
            }
         }


        // Invoke picker if requested.


        if (bInvokePicker) {
             SetPartyPickerGUIStatus(2);
             ShowPartyPickerGUI();

        }


}
Yeah, I know. It can't really be any smaller. Feel free to modify it if you're confident with scripting.
Add Your Custom Autolevel Template to GetCustomFollowerALTable()
While you can pass the ID you made for your autolevel template to that monster function as an argument, it's better to have them all in one place if you have multiple followers.
GetCustomFollowerALTable() is the first function in our include, and you can add an explicit if test for your follower there to assign the correct table id (the one from your M2DA_base_ m2DA). There is a function very much like it in sys_autolevel_h.nss for the core followers, so we'll copy Bioware's practice.
Let's take a look at the function by itself:
int GetCustomFollowerALTable(object oFollower) {
    int nTable = _GetTableToUseForAL(oFollower);

    if (GetTag(oFollower) == "bc_party_miera") {
        nTable = 50143;
    }

    if (GetTag(oFollower) == "bc_party_jysavin") {
        nTable = 50144;
    }

    if (GetTag(oFollower) == "bc_party_geldual") {
        nTable = 50145;
    }

    if (GetTag(oFollower) == "bc_party_braghon") {
        nTable = 50146;
    }

    return nTable;

}
So we have a test for each follower tag from my module, matching up to an ID which is assigned to nTable. All you need to do is change a tag from my follower to yours, and my ID to the correct one from your M2DA_base_* m2DA. Then you should delete the rest of the example if statements :)
Save and export the script. Ignore the compiler error about lack of main();
Include Function In Your Hire Script and Call It
So instead of a hire script that calls UT_HireFollower(), we want one that includes our shiny new function and calls it.
Take a look at the following example:
#include "plt_bc_create_party"   //Make sure you include your party handling plot
#include "hireCustomFollower_h"  // And include the function script - which will in turn include a bunch of stuff


void main() {

                    //Initialising my objects, not super-relevant to the example

                    object oHero = GetHero();
                    object oMiera = CreateObject(OBJECT_TYPE_CREATURE, R"bc_party_miera.utc", GetLocation(oHero));
                    object oJysavin = CreateObject(OBJECT_TYPE_CREATURE, R"bc_party_jysavin.utc", GetLocation(oHero));
                    object oBraghon = CreateObject(OBJECT_TYPE_CREATURE, R"bc_party_braghon.utc", GetLocation(oHero));
                    object oSpider = CreateObject(OBJECT_TYPE_CREATURE, R"bc_party_geldual.utc", GetLocation(oHero));


                    //Simplest hire call - adds to the party as a wizard.  Class is currently compulsory due to a bug.

                    hireCustomFollower(oMiera, CLASS_WIZARD);


                    //Add to the party and set joining plot flags


                    hireCustomFollower(oJysavin, CLASS_WARRIOR, PLT_BC_CREATE_PARTY, PARTY_JYSAVIN_JOINED);


                    //Add to the party, set plot flags, force a specialisation

                    hireCustomFollower(oBraghon, CLASS_ROGUE, PLT_BC_CREATE_PARTY, PARTY_BRAGHON_JOINED, ABILITY_TALENT_HIDDEN_ASSASSIN);


                    //More complex example - Follower added as a unique class (Dog), not granted a specialisation or spec point.
                    //Note unique classes must have an ALTable passed here or specified in GetCustomFollowerALTable() or they won't work

                    hireCustomFollower(oSpider, CLASS_DOG, PLT_BC_CREATE_PARTY, PARTY_GELDUAL_JOINED, 0, 0, FALSE, FOLLOWER_STATE_AVAILABLE, "", 0, 0, FALSE);


                    //Show the party picker to let the player choose from their new companions!

                    SetPartyPickerGUIStatus(2);

                    ShowPartyPickerGUI();

}
The example shows several of the more simple ways of invoking the function. Check the comments at the start of the function for a full list of arguments.
I would suggest best practice for most followers would be to call as follows:
hireCustomFollower(oFollower, CLASS, PLOT, PLOT_FLAG, SPECIALISATION)
This will safely set the follower up as the desired class and specialisation (doubly important if there are spec abilities in their ALTable) while setting your plot flag for them being in the party. hireCustomFollower(oFollower, CLASS, PLOT, PLOT_FLAG, SPECIALISATION, 0, TRUE) will do the same while invoking the Party Picker automatically.
Note that the specialisations are abilities and not classes - you'll find them as ABILITY_HIDDEN_ constants.
If it's all worked, you should find you can now add followers with a lot more flexibility!
Common Follower Problems & FAQ
Why don't my followers gain XP?
There is a bug in UT_HireFollower. For now the best/easiest approach to take might be to make a copy of UT_HireFollower in an include file and rename it something like UT_HireFollower_Fixed, then make the following change:
WR_SetFollowerState(oFollower, FOLLOWER_STATE_ACTIVE, TRUE, 0, TRUE);
to
WR_SetFollowerState(oFollower, FOLLOWER_STATE_ACTIVE, TRUE, 0, bPreventLevelup);
(Note: Be aware if you use the name UT_HireFollower_Fixed you may end up finding your include file conflicting with someone else who has named it the same in their include.)
Alternately you need to clear a flag in a separate script to the one in which they're hired.
You must use the SetLocalInt(oFollower, CREATURE_REWARD_FLAGS, 0); statement in a script you can be sure will run soon after your hiring script.
When I choose followers from the Party Picker, they spawn into the area but do not join.
You need to intercept the EVENT_TYPE_PARTYMEMBER_ADDED event and set the follower to FOLLOWER_STATE_ACTIVE. See Simple Follower Creation earlier in this document.
My followers don't have skill trees!
If a follower hasn't been through an initial chargen/autolevel event (via player_core/sys_autolevel_h) then the skill tree doesn't show. You're probably trying to be clever and get around UT_HireFollower without going all the way (see monster function above ^_^).
My followers don't have a class
GetCreatureCoreClass() seems flaky under some conditions. It's best to explicitly set the class yourself; this is why class is currently a mandatory argument to hireCustomFollower()
Isn't there an easier way to do this?
Possibly. There is a way of recruiting a follower by setting a plot flag. However I don't understand it, and I expect it still doesn't allow custom autolevel templates, full control over specialisations etc. There's still a fair bit of stuff hardcoded for the core followers, I'm not sure putting a custom follower through the same process as Al, Leli et al will have good results.
