Creating a new level
| Level editor topics |
|---|
|
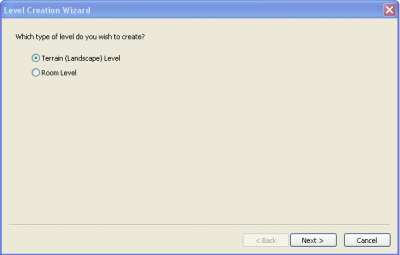
To start the creation of a new level, choose to make a new level through the File menu or by right clicking on the palette. This will present you with a wizard that will set up several basic attributes. Note that some of these attributes can't be changed once the level has been created.
The first choice is whether to have a terrain mesh (the "ground") or not. A Room-based level uses a user-specified visibility graph that connects disjoint rooms together, useful for interiors and dungeon like areas. Rooms are constructed using only existing models created in 3dsmax or another modeling package. In comparison, the Terrain-based level is expansive, with no direct manipulation of what is visible from certain locations. It also contains a terrain mesh that can be manipulated in the editor. Models placement on top of this terrain mesh is similar to the Room-based levels.
If you choose to have a room-based level you'll have to place chunks of floor, walls, and ceiling to enclose the player on all sides. Room-based levels have no further attributes that need to be configured during new level creation, so if you select "room-based" you'll be taken straight to the level editor from here.
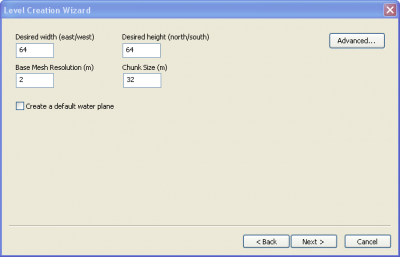
If you choose terrain-based, you'll be asked to define some attributes for the terrain mesh. By default you're shown the basic set of attributes:
- Terrain mesh dimensions, in meters. Note that 64 by 64 is about the minimum that can produce a serviceable level, and that 256 by 256 is the maximum before one starts risking bad performance - though levels can be made larger than this if one takes care.
- Base mesh resolution - determines the size of the individual triangles that make up the terrain mesh. The default has 2 meter triangles. Note however that you'll be able to manipulate the terrain at a much higher resolution than this by using the tessellation tool; each tessellation level splits the previous level's triangles up into four smaller triangles.
- Chunk size - chunks are the basic simulation unit used by the engine. The default 32m is a good chunk size. You'll probably not want to reduce it smaller since you can't have the terrain mesh overhang from one chunk into another; smaller chunks could place limits on the sorts of terrain warping you'll be able to do later.
- Create a default water plane - Creating additional water planes later on is quick and easy, but this option provides a pre-made one by default.
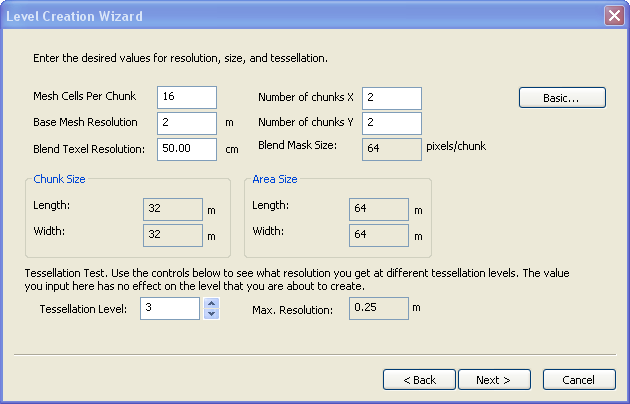
If you click the "advanced" button you'll be provided with a different presentation of the level's dimensions. Instead of defining its dimensions directly you can set how big chunks are and how many chunks there are in each dimension, defining the level's overall dimensions implicitly.
There's one important attribute that can only be set in the advanced pane; the texel map's resolution. A texel is a "texture element", a sort of high-level pixel equivalent that defines a texture instead of just a single uniform colour. The terrain is "painted" with texels, described later.
- Cells Per Sector: This is the number of cells per side of a sector, for example if there are 8 cells per sector, then each sector will have 8x8 cells.
- Base Cell Resolution: This is the length of a single side of a cell in meters. For instance, 8m means that each cell is 8m x 8m.
- Blend Texel Size: This is the length on a single side of a Blend Texel. For instance 100.00cm means that each Blend Texel is 100cm x 100cm (1m x 1m). This is essentially the resolution at which you can paint. It makes sense to set this to something large, which is a good default for the whole level. An artist can set this on a sector by sector basis, later on, in the areas where he/she needs more detail.
- Sector Size: This is the length of a single side of a sector and is reached by multiplying the cells per sector by the base cell resolution (un-editable).
- BlendPageSize: This is the size of the Blend Mask for a Sector/Chunk, and is reached by dividing the sector size by the blend texel size. For instance 64 means the blend mask image for this sector will be 64 x 64. Due to graphics hardware limitations, the actual exported texture may be scaled to a power-2 texture.
- # Cells: This allows the artist to specify the length and width of the terrain level by specifying the number of cells on each side.
- Area Size: This is the length and width of the terrain level in meters, and is reached by multiplying the number of cells by the base cell resolution (un-editable).
- # Sectors: This is the number of sectors/chunks in the terrain world, and is reached by dividing the number of cells by the cells per sector (un-editable).
- Tessellation Level: This is simply to allow the artists to see what resolution they can reach at a given tessellation level, it has no lasting effect on the level. Set this to 4 (max) to see what resolution the artist can reach given the above settings.
- Max. Resolution: This is the maximum poly resolution that the artist can reach given the tessellation level set in the Tessellation field to the left (un-editable).


