Cutscene tutorial
| Cutscene topics |
|---|
Cutscenes can be stand-alone cinematic sequences that are triggered by scripts in the course of the game, or they can be inserted into conversations in place of the simplified cinematics that conversations can automatically generate.
Our example situation in this tutorial will serve as the beginning of a conversation between the player and two NPCs. The player has just arrived at the campsite where these two NPCs are staying. He walks up to the fire. One of the NPCs is happy to see the player and greets him, but the other is distrustful. The two share a brief exchange to establish this before the interactive part of the conversation begins.
Contents
Creating a new cutscene
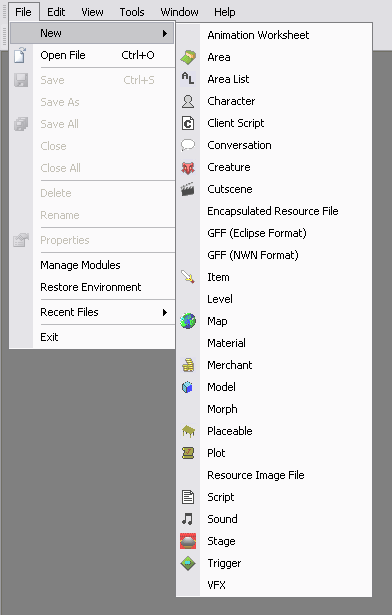
To create a brand new blank cutscene resource, create a new resource in the usual way:
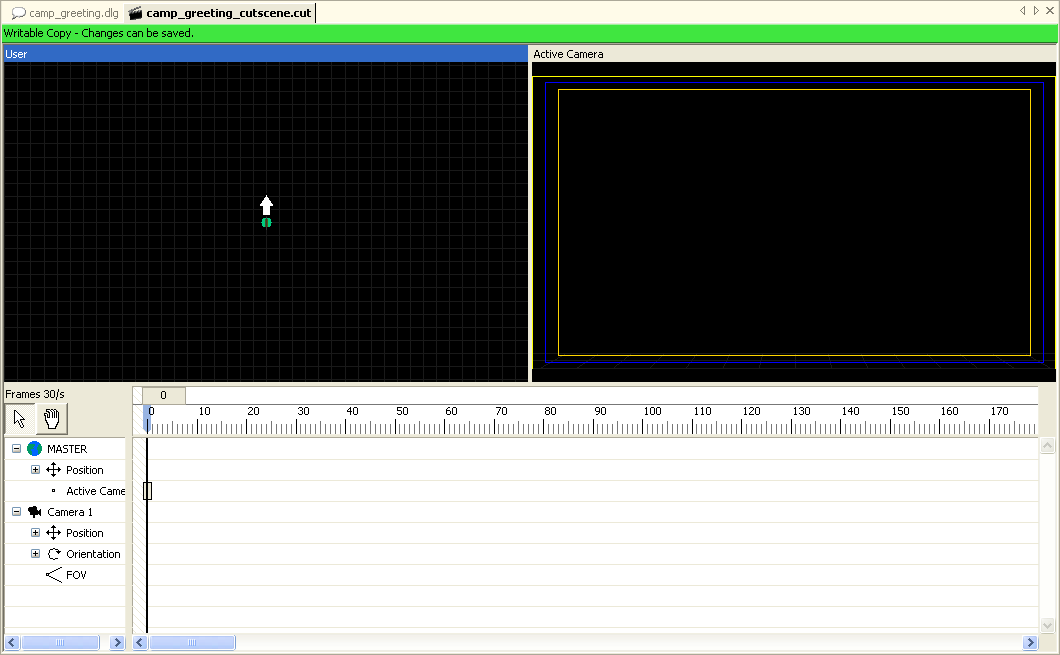
The result is opened in the cutscene editor.
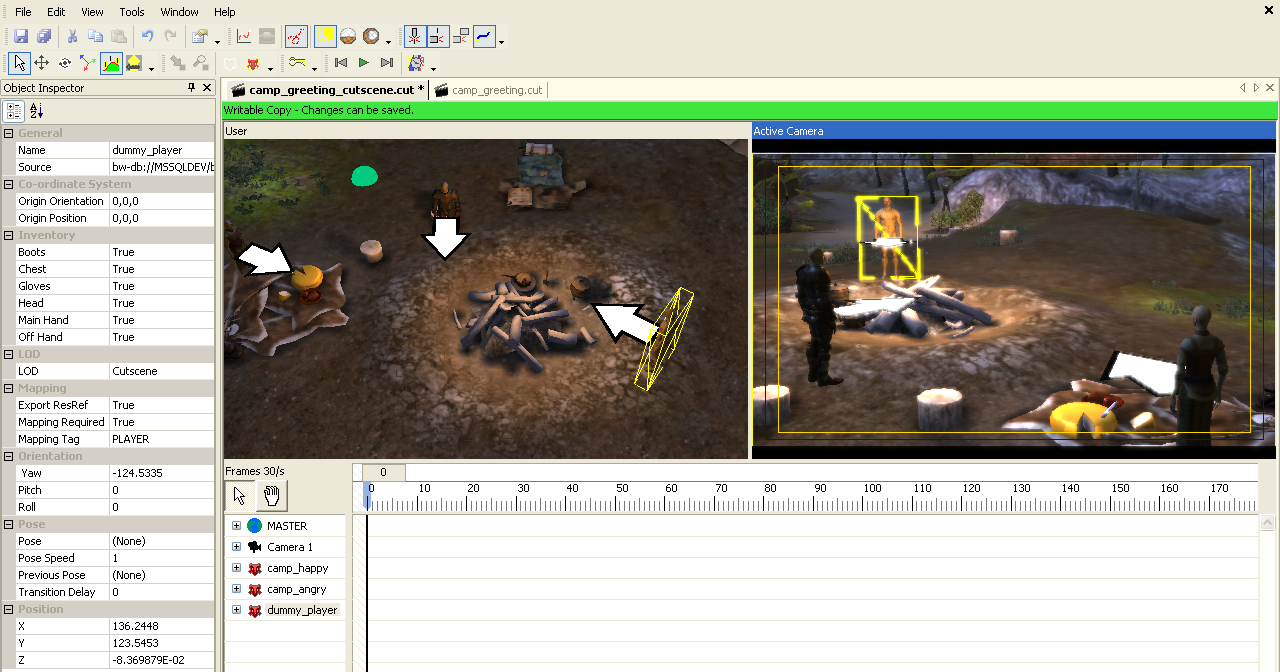
There are two basic sections to the cutscene editor; the viewports (top) and the timeline (bottom).
Viewports
- Viewports can be attached to various cameras to preview what they can see
- Add a "Safe Frame" to camera viewports to ensure the correct aspect ratio
- Set a viewport to "User" to see where cameras are positioned from another perspective. This can be done by selecting "Detach From Camera" in the viewport's right-click menu in the title bar
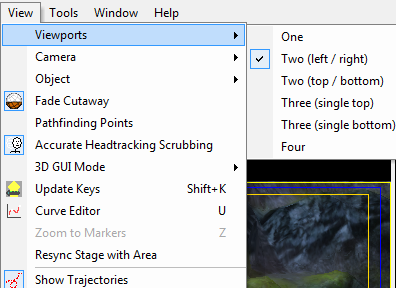
The camera viewports in the cutscene editor work similarly to the viewports in the stage editor. You can set the number and layout of viewports under the "View" menu:
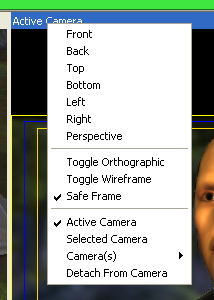
And for each individual viewport you can select which camera it's showing and set other display options by right-clicking on the title bar of the viewport:
When you set a viewport to show the view through one of the cutscene's cameras, it's a good idea to turn on that viewport's "Safe Frame" option as well. This will put a border on the viewport showing what will be visible when the cutscene plays.
Note that when you play the cutscene in the cutscene editor, only the currently selected viewport (the one with the blue title bar) will show the cutscene "live" - the others won't update the view displayed in them until they're selected. To preview the cutscene as the player would see it in the game, you will need to set one of the viewports to "Active Camera" and ensure that this viewport is selected when you play the cutscene in the editor. If the "Active Camera" viewport turns gray, try setting the cutscene property "Enable Level Effects" to false.
Timeline
- There is always exactly one MASTER object in a cutscene.
- Each active object is listed on the timeline, with multiple "tracks" for each.
- All objects have position tracks (divided into X, Y and Z tracks). Some objects have additional built-in tracks.
- Other actions and effects can be added to generic tracks. Objects can have as many generic tracks as you want.
Below the viewport is the timeline. Along the top of the timeline is a time scale; it can be set to show in frames (at 30 frames per second) or milliseconds by changing the "Time Scale" property of the cutscene in the object inspector. A marker indicates what point in the timeline the viewports are currently showing.
Below is a set of rows containing the various actors, cameras, and other objects active in the cutscene. This is where most of the editing is going to take place. Each object will have a number of "tracks", which will contain commands that are sent to the actors at particular times in the course of the cutscene.
The first object in the track list is the "MASTER" object. This is a special object that every cutscene has exactly one of. The MASTER object is the cutscene equivalent to the root node of a conversation tree, a repository for global settings and effects. For example, the MASTER object contains the track that determines which camera is active at any given time. The MASTER object cannot be deleted. By default, a MASTER object appears in the cutscene editor as a small greenish sphere; you can change the MASTER object's appearance in the cutscene option settings.
A new cutscene also has a camera, called Camera 1. This camera can be deleted or renamed if you like; we can add new cameras as needed later on.
Every object has "Position" and "Orientation" tracks that control their locations in space. Cameras also have a FOV (field of view) track.
Objects can have other "generic" tracks added by the editor as needed. These generic tracks contain all the other commands and directions we can give.
The setting of the cutscene
- The MASTER object should be moved somewhere near the center of your cutscene.
- You can optionally set a stage for your cutscene, enabling stage-related actions for objects.
Establishing the setting of a cutscene is done in the object inspector in the group of properties labeled "Setting". The most important of these is the "Area" property, which allows you to set the cutscene in an existing area. We already have a suitable area that was created in an earlier tutorial; the area "great_outdoors".
By default the MASTER object and Camera 1 will be located at the coordinates 0,0,0 in the area. You'll want to move the camera to the appropriate location within the area using standard 3D controls for movement and view management. The MASTER object is invisible when the cutscene is played in-game so it usually doesn't matter where you put it. However, there are some settings that depend on the MASTER object's location - for example, you can set level-of-detail for models so that the model's LOD varies depending on how close it is to the MASTER object - so it's probably a good idea to put MASTER somewhere near the middle of where you'll be having the cutscene's action take place.
You can also set a stage for the cutscene. This is optional, but setting a stage enables "Jump to Stage Place" and "Jump to Stage Camera" actions that could help make setting the cutscene up easier if you already have a good stage defined in the area.
Adding objects and creatures
- Objects already present in the area the cutscene is set in are inactive by default. You need to activate them to control them.
- Other objects can be added from the resource palette as normal.
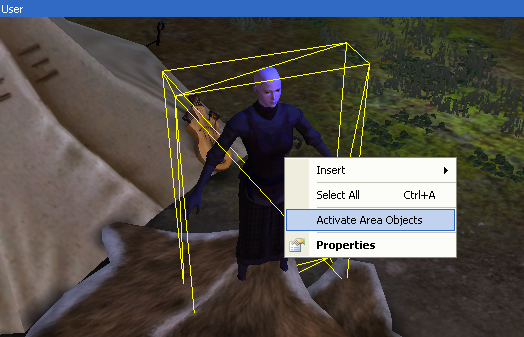
All of the objects that are normally present in the area (such as creatures and placeables) will be visible in the cutscene editor, but they'll all initially be marked as "inactive". This means that, although they'll be visible in the cutscene when it plays, they won't be controllable; they'll just do whatever ambient activities they would be doing normally. In the case of our campsite area there are two creatures that were placed here in the area editor; the happy camper, named camp_happy, and the angry camper, named camp_angry. We need to seize control of them to make them active participants in the cutscene's activities. To make them active, right-click on them and select "activate objects":
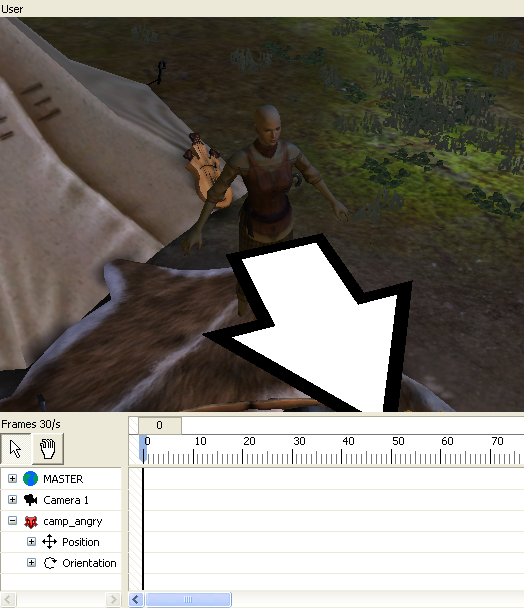
The object will then become an active object in the cutscene, getting its own entry in the timeline that will allow you to control its actions.
We'll activate both of these campers since they'll both be taking part in the cutscene's dialogue.
You can also add objects that aren't normally a part of the area. Simply open the object palette, select the creature or placeable you wish to use in the cutscene, and then click in the viewport to add the object to that location. It will automatically be made active and get an entry in the timeline. The player won't see these objects during regular play, since they're not a part of the area - they're only in the cutscene.
If you want to make an area object disappear during the cutscene you'll need to activate it (allowing you to control it) and then add a track with an action that makes it invisible in the first frame. It will go back to normal again when the cutscene ends and the game resumes, cutscenes are run entirely separate from the main action of the game and have no direct effects on it.
Adding the player
- Use the "Mapping Tag" property on an actor to make the game replace it with another object (such as PLAYER) at run-time.
Normally we don't have to worry about placing the player in an area since the player controls his own movements and actions. But when we're doing a cutscene we can control the player just like any other actor, so we'll need a way to insert the player as an active object. Furthermore, since we'll have no idea what the player is going to look like at any given moment, we'll need to have a way to insert the player as he appears in the game when the cutscene begins.
This is done by inserting a "dummy" virtual actor and then setting the actor's "Mapping Tag" property to the special "PLAYER" tag.
It doesn't matter what the dummy actor looks like now, it will be replaced with the player's character later on, so we'll just use a default male human model to make it both simple and obvious.
There are ways to tweak the way the cutscene plays based on other characteristics of the player, for example by modifying the position of the camera to account for the player's height or by adding additional dummies to represent followers. We won't go into these more advanced topics in this tutorial.
Adding cameras
- Remember to enable Safe Frame when attaching a viewport to a camera.
- Use an "Active Camera" viewport to preview the cutscene.
- Use a "User" viewport to see camera positions from the outside. This can be done by selecting "Detach From Camera" in the viewport's right-click menu in the title bar.
We could film a cutscene entirely from one camera if we liked, either as a single static shot or by moving the camera around to new positions as needed. It's easier and more convenient in most cases just to add several different cameras, however, and use the "Active Camera" track on the MASTER object to switch between them.
For our cutscene we're going to want three different cameras; one camera that's a wide shot showing the player arriving at the campfire, one camera focused on the angry camper, and one focused on the happy camper. We could add more than just these three to make the scene even more dynamic but for simplicity we'll stick to just those for now. We can add more later.
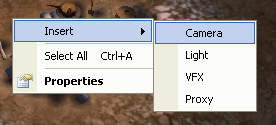
Cameras are added by right-clicking in the viewport and selecting "Insert → Camera".
You can then position them using standard 3D controls. To make it easier to get the camera set up with the correct view, a good technique is to set one of the viewports to display the camera's feed; you can then reorient and reposition the camera using that viewport's camera controls while getting immediate feedback as to what the camera will see in its new state.
We're also going to rename the three cameras at this point with names intended to remind us of what their purposes are. We'll name them "Arrival Camera", "Happy Camera", and "Angry Camera". We'll want "Arrival Camera" to be active initially, so we may as well use the original camera for this role; it's already set active by default. We'll see how to switch which camera is active later in this tutorial.
We now have all the basic props we need to get the cutscene going.
Adding an animation to an actor
- Set the "Pose" property for actors to make them breathe and fidget naturally when not doing other animations.
- Other animations are set by adding "Play Animation" actions to a generic track.
- Animation filenames are often arcane and hard to find.
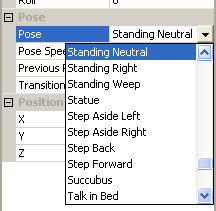
If you play the cutscene now the first thing you'll probably notice is that the actors are all standing perfectly motionless. Normally someone who's standing still isn't really standing perfectly still; they breathe, they shift their weight from foot to foot, and so forth. Since almost every actor we use is going to need to do this we don't want to have to spend a lot of effort setting it up, and fortunately we don't have to. Every actor has a "Pose" property in the object inspector. Simply set this pose to "Standing Neutral" and the actors will display this default subtle movement whenever no other animations are being explicitly imposed on them.
Our next task is somewhat less trivial; we want to show the player walking up to the fire. We're going to have to add a walking animation to the player's actor that runs for a short period of time and then stops.
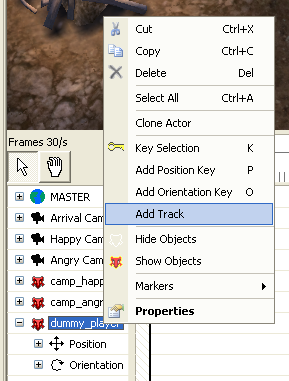
To do this we'll need to add a new track to the actor's timeline. Right-click on the actor's entry in the timeline and select "Add Track" from the resulting menu:
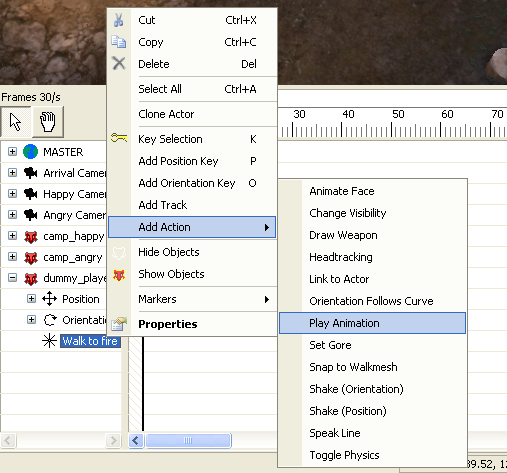
The new track will be named "New Track" by default and will start out empty. Actors in cutscenes will sometimes have dozens of tracks directing their actions so we'll want to rename the track to something a little more informative. In this case we'll name it "Walk to fire". To have it actually cause the player's actor to walk to the fire we'll need to add a "Play animation" action to it. Right-click on the track and select "Add Action" to get the menu to select this.
The action will be added starting at the point you're currently viewing in the timeline, so you may wish to move the timeline's time slider back to the beginning before adding this animation. You can reposition an action along the timeline simply by dragging it with the mouse.
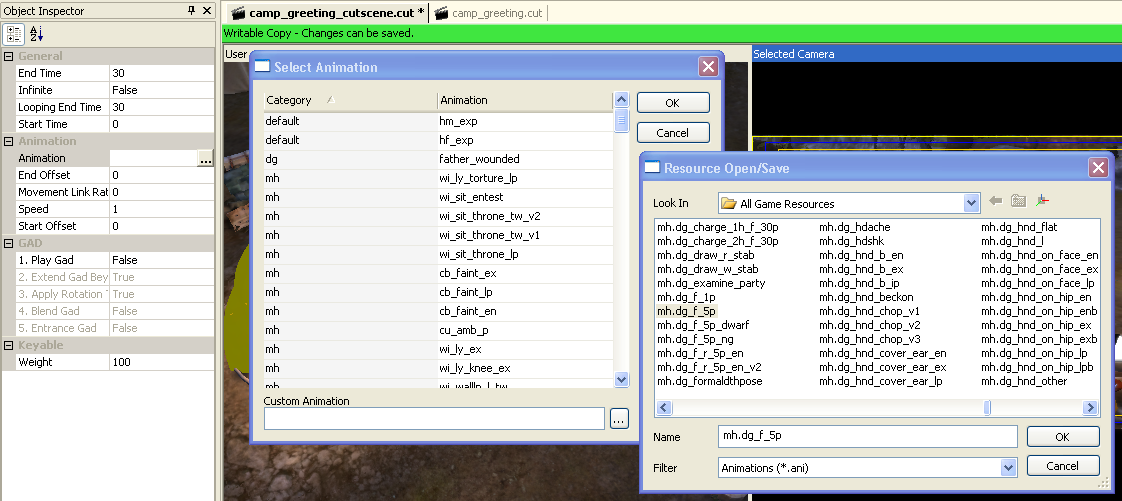
Initially the action has no animation associated with it. To set the animation, select the action in the timeline and then in the Object Inspector go to the "Animation" property and click on the ellipsis (![]() ) button.
) button.
Unfortunately this is where things turn a bit arcane since the names of the various animation files are often very unclear and not all will appear in the default list. You may need to resort to trial and error to find one you like, but there are many hundreds of animations available in the game's resources so this could take some time. See animation list and Beerfish Excel Utilities for a list of many of them.
Note that only a single animation can play at any time on a given track. However, it is possible to have multiple animations for a character, each of which must be on a different track. This is essential in order to be able to blend animations together as detailed in Play_animation#Blending_Animations. Animation blending is necessary in order to have your characters transition seamlessly from one animation to another, which is essential to making character movement look natural.
In this case the animation we want, "mh.dg_f_5p" ("male human dialog forward five paces"), doesn't appear in the default list of animations available in the animation picker. You'll need to click the ellipsis button next to the "Custom Animation" field and find it in the complete list of all animation resources.
If you try playing the cutscene now you'll see that the player's actor will spend a little over five seconds walking and then come to a natural stop - about as long as we needed. But the actor will be animated in place, his legs taking steps but not actually moving him anywhere. This is where position keys and GAD comes in.
Moving an actor
Position and orientation keys
- Objects can be moved over time by setting "key frames" on their position and orientation tracks.
- Intermediate frames are interpolated between key frames.
- You can set the curve type between key frames with the "transition out" property for each key.
Every object in a cutscene has a pre-defined "Position" track with three sub-tracks for its X, Y and Z coordinates. Most objects also have a pre-defined "Orientation" track with three subtracks for roll, pitch, and yaw. These tracks can be used to cause an object to move around within the area over the course of the cutscene.
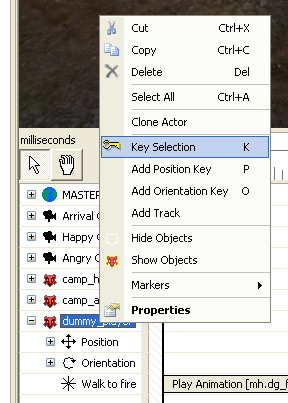
Movement is handled by setting the position and orientation of objects at specific points in time, called key frames, and then interpolating intermediate positions and orientations. To set a key frame, right-click on the actor's entry in the timeline and select "key position". This will set a key for the current position and orientation at the current time in the timeline. You can set position and orientation keys separately if you like. Since this operation is so common there's a very convenient shortcut for it; "k" inserts a key for the currently selected object's position and orientation, "p" inserts a key for its position, and "o" inserts a key for its orientation. Alternately, select the object and click the key command in the toolbar: ![]()
For our purposes right now all we'll need to do is set a key frame at the beginning of the timeline. Move the pointer to the beginning, select the player actor, and set a key. Small boxes will appear on the position and orientation tracks to mark the key frame.
These markers essentially mean "at this particular point in time, dummy_player will be in this particular place and facing in this particular direction."
To get an actor to move over time you could set two key frames - one at the beginning of the movement, with the actor in his starting position, and one at the end of the movement, with the actor at his end position. You can set how the cutscene engine interpolates between the two positions by setting the "Transition Out" property of the starting keyframe to either Bezier (a smooth curve), Linear (a straight line), or Step (a sudden jump from the starting position to the end position). See the curve editor page for more detail.
We're not going to actually do this in this case, however; we'll try it at a later point in this tutorial to move a camera around. For this particular actor it would be difficult to manually match the actor's walking action with his motion over the ground. If the animation and the movement don't match the actor's feet will "skate" unrealistically along the surface.
There's an easier way to match an animation such as this one with movement through the scene; a mechanism called GAD.
Using GAD
- GAD is a mechanism by which an animation applies a built-in displacement to the object it's animating.
- You need to set at least one key frame for an object to use GAD, even if you don't otherwise use key frames to move it.
GAD is a displacement that is automatically added to the actor's current position as the animation plays. Each animation has its own GAD information built into it, custom-designed to make the actor move in a manner appropriate to its actions. If we enable it the actor will be moved forward as the animation plays.
Not all animations have GAD associated with them. For example, having an actor wave his hand wouldn't displace him, so there would be no GAD associated with that animation. We only need to worry about GAD in cases like this one where the animation should accompany movement.
To enable GAD select the animation action and set "Play Gad" to true in the object inspector. If no key frames have been defined for the actor the cutscene editor will pop up a warning at this point suggesting that we add position and orientation keys before we add GAD:
It's important to set at least one set of keys for an object using GAD. The animation's GAD may seem to work correctly without it at first, but unexpected and unpredictable errors could occur later that will send the actor careening off into the distance.
Once we've set a key frame and have set the action's "Play Gad" option to true you'll see that the actor now moves forward as he walks. This is good, but since we started him off in the position he's meant to end in it results in the actor walking straight through the campfire. You'll need to move the actor back so that he starts farther away from the fire.
Note: If you have already set a keyframe as described in the previous section, you will need to set an additional one for the actor's new location (or alternately set the "update keys" mode with the ![]() tool), otherwise the moment the animation starts, the actor will instantly jump back to the place he was before when you set the first keyframe. Once you set a keyframe for an actor, moving the actor around in the cutscene editor does not really change the actor's position unless you re-set the keyframe to the new position that your actor is in. Keyframes and the curves interpolating between them always take precedence.
tool), otherwise the moment the animation starts, the actor will instantly jump back to the place he was before when you set the first keyframe. Once you set a keyframe for an actor, moving the actor around in the cutscene editor does not really change the actor's position unless you re-set the keyframe to the new position that your actor is in. Keyframes and the curves interpolating between them always take precedence.
- An animation's "Extend Gad Beyond Action" property makes Gad's displacement persist after the animation ends.
The other GAD properties are set to the most appropriate defaults automatically when you select an animation but one particular property bears mention here in case you run into trouble with it later on; the "Extend Gad Beyond Action" property. In the case of this walking animation it defaults to true. That means that once the animation ends, the displacement that the actor has undergone as a result of it will remain in effect - he will stay in the final position he walked to. If this were set to false, once the animation ended all of the displacement the actor had gained as a result would be undone and he'd instantly jump back to where he started walking from again. If at some point in the future you find your actors doing this, this property is the first place to look for the answer.
There's one final detail we'll tweak here. The walking animation begins with the player starting from a standstill, which is not the impression we want to convey; the player has supposedly been walking for some time before the camera started rolling. We could set the animation to begin playing partway through by changing the animation action's "Start Offset" property, but since this is happening at the beginning of the cutscene's timeline an easier approach is to simply select the animation action and drag it so that it begins a half second before the cutscene does. The cutscene will only begin displaying at the 0 mark and anything that falls before this point in time will never be shown so the initial half second of the actor's walk animation will go unseen.
Moving a camera
The scene now has some of the dynamic action we wanted, showing the player walking up to the campfire and stopping at its edge. But it's still a rather dull introduction and we can do better. Instead of a static camera shot we can set the camera so that it pans across the scene to follow the player's arrival.
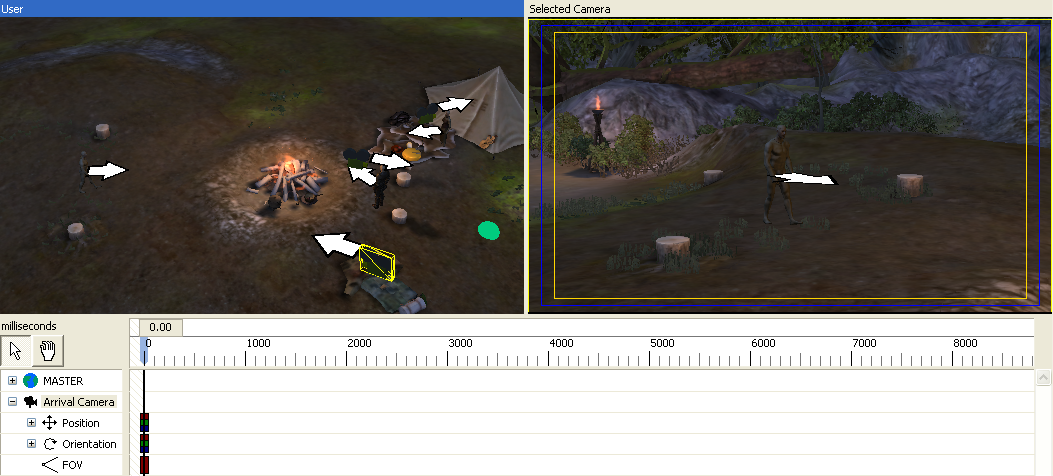
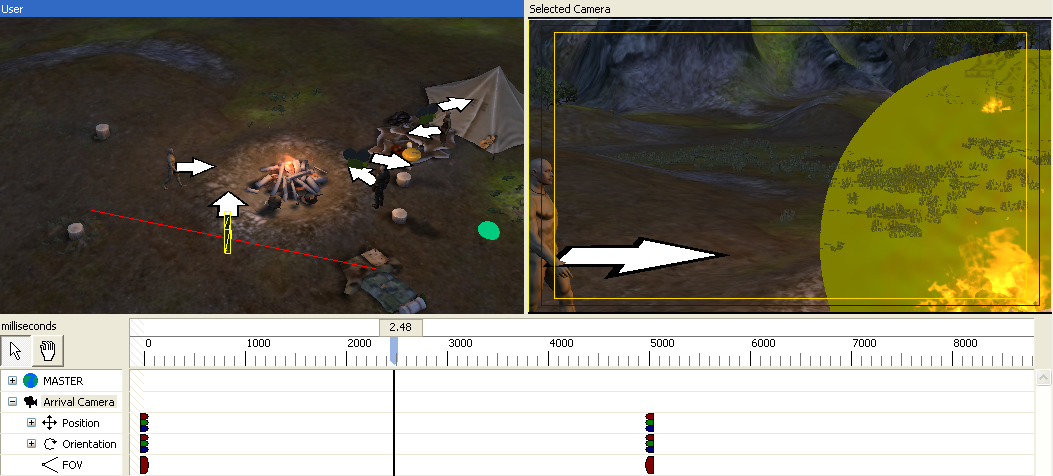
Select the Arrival Camera and open up its track list. It has Position and Orientation tracks just like the other actors, and can have keyframes set just the same. With the time marker set to 0, move the Arrival Camera so that its view shows how you want the shot framed at the beginning of the cutscene. In our example we're going to set it so that it shows the player in the center of the frame. With the camera still selected, press "k" to set a key frame for the camera.
(You may notice that the Field of View (FOV) track also gets a key marker. We won't be changing the camera's FOV so you can ignore that.)
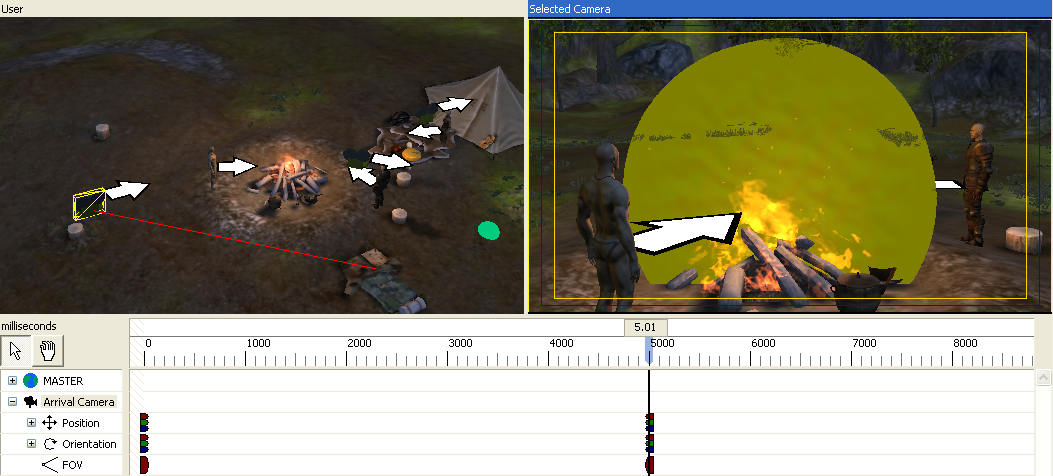
Next move the timeline scrubber to the end of the walking animation at the 5 second mark. The player's actor will now be at the final position where he'll be standing for the conversation. Change the camera's orientation, panning to the right so that all of the actors can be seen in its field of view. In our case the camera's too close to encompass everyone so we'll also move its position to allow it to see them all.
Once you have the shot lined up correctly, press "k" to set a second keyframe.
You may notice that the User viewports now show a red line tracing out the selected object's trajectory through space (if not, you may need to click the "show trajectories" ![]() button in the toolbar). As the first five seconds of the cutscene plays, the Arrival Camera should slide smoothly along the red line and rotate smoothly on its axes to transition from the first keyframe to the second keyframe (If it suddenly jumps from one position to the other instead you may need to click the "default curve mode" tool
button in the toolbar). As the first five seconds of the cutscene plays, the Arrival Camera should slide smoothly along the red line and rotate smoothly on its axes to transition from the first keyframe to the second keyframe (If it suddenly jumps from one position to the other instead you may need to click the "default curve mode" tool ![]() and try setting the keys again, or change the "transition out" property of the keyframe to Bezier).
and try setting the keys again, or change the "transition out" property of the keyframe to Bezier).
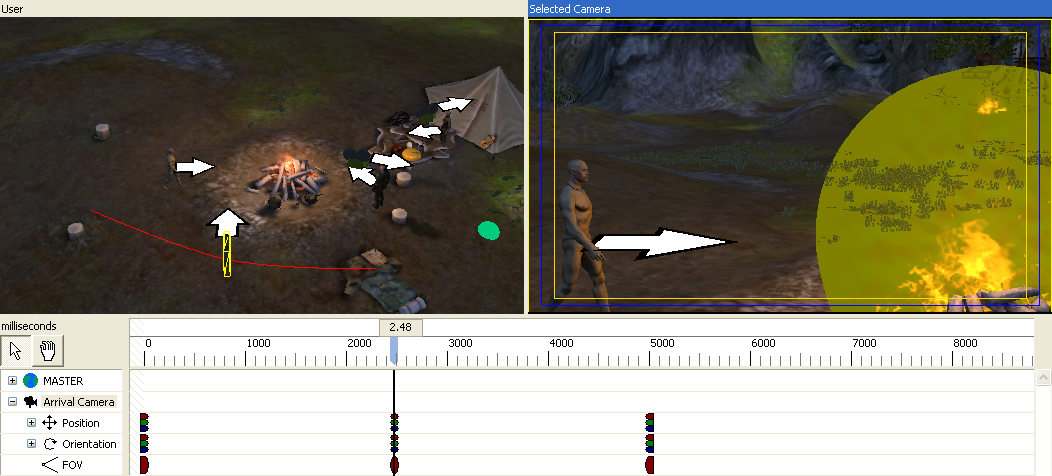
You can fine-tune the trajectory of the camera by adding additional keyframes between the starting and ending ones. In our case we see that when the time marker is set to the middle of the camera's movement the player slips slightly out of frame.
We can fix this by changing the camera's position and orientation as needed, and then adding a new keyframe with "k". In this case we'll pull the camera back slightly so that its motion through space becomes a curve instead of a straight line.
We now have a nice, dynamic establishing shot. The scene begins with the player alone and in the center of the camera's shot, and as he walks toward the fire the camera moves and pans around him to show him arriving in the presence of our two campers.
Switching cameras
- A track on the MASTER object defines which camera is currently "active."
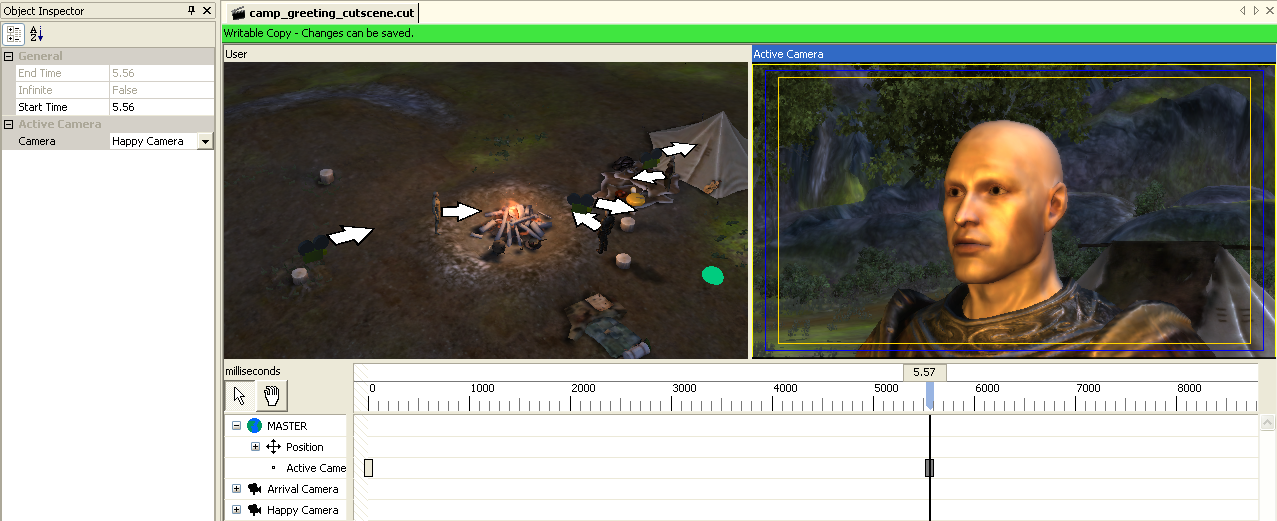
Once the player arrives he is going to be greeted by the camper who is happy to see him. To give a clear shot of who's doing the talking, we'll want to switch the active camera from Arrival Camera to Happy Camera.
The track where the active camera gets changed is attached to the MASTER object. Move the timeline's time indicator to the point in time where you wish to switch active cameras, in this case 5.5 seconds (giving the scene a half-second view of the player after he's come to a halt). Right-click on the Active Camera track and select Add Action. The only option available for this track is the "Switch Camera" action so go ahead and add one. In the new Switch Camera action's properties set it to switch the active camera to Happy Camera.
Now when the cutscene is played we'll get an establishing shot showing the player walking up to the fire and then switch to a closeup of the happy camper so that he can deliver his greeting.
Adding dialogue
- Lines of dialog can be inserted from an existing conversation resource. For convenience, create a new conversation to hold the dialog for a cutscene.
- Caption text, voice over, and facial performance are all included with each line.
- If you edit the conversation later, the changes will be reflected in the cutscene. Remember to generate new VO and FaceFX in the conversation editor.
There are three major components to dialog in Dragon Age; the text of the line being spoken (which is displayed as a caption at the top of the screen), the voice-over for the line being spoken, and the facial performance that makes the virtual actor lip-synch and display appropriate emotions.
There's already a tool in the toolset that is designed for handling all of these things; the conversation editor. Actors in a cutscene can be given "Speak Line" actions that cause them to deliver lines from an existing dialog, with all three components added together into the actor's performance automatically.
Here we are going to add dialogue to a cutscene (though sometimes it is better to take a conversation-centred approach).
To create the dialog for this cutscene we'll now create a new conversation resource. This conversation is not going to be used in the game directly so we'll be able to ignore many of the more advanced features and settings covered in the conversation tutorial; its only purpose is to serve as a repository of dialog lines for use in this cutscene.
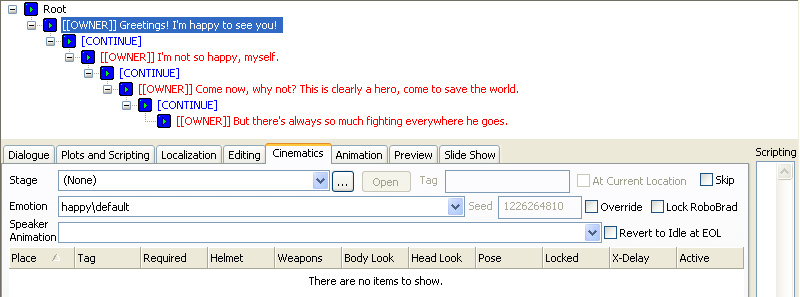
The following screenshot shows our intended conversation. The only things that we need to define for it is the text of the dialog and optionally the emotion settings for RoboBrad to use when generating facial performance. As with our previous conversation we'll generate synthesized placeholder voice-over and generate FaceFX based on that; when we record real voice over later on we can simply update this conversation with it and the cutscene's performance will change to match.
To help keep track of which lines are spoken by which actors you could also optionally set the speaker tag on each line to identify who's doing the talking. This particular conversation has only two speakers so we won't bother with that. The cutscene engine won't need speaker tags, we'll be explicitly telling it who is saying each line. You'll only need to set those things if you wish to preview the conversation before using its lines in the cutscene.
Once you've created your dialogue go back to the cutscene editor and add a new track to the camp_happy actor. Rename it to something informative, such as "Dialogue". Move the timeline marker to the spot where you want the actor to start speaking and add a new "Speak Line" action.
In the Speak Line action's properties, set the "Source Conversation" property to the conversation resource we just created. Then, select the specific line you want the actor to speak in the "Source Line" property (it will have a drop-down menu with all of the lines from the source conversation in it).
That's all you need to do to get the actors to talk. You may wish to add one other detail at this point; head tracking. This is the action that causes actors to turn their heads toward a specific target, usually the person they're talking to or who is talking to them. It's added as its own action, so create another track and add a headtracking action to it with the player as the target. In this case we want the happy camper to turn his head toward the player right before he starts speaking.
Adding other details
- Headtracking actions make actors look at other objects in the cutscene.
- You can have more than one action on a track provided they don't overlap.
We've now gone through all the basics, so we'll just finish fleshing out the conversation with a few other details that are done the same way as the examples above.
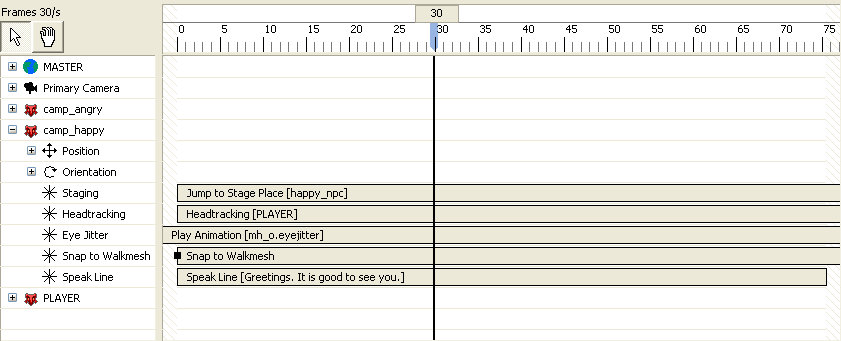
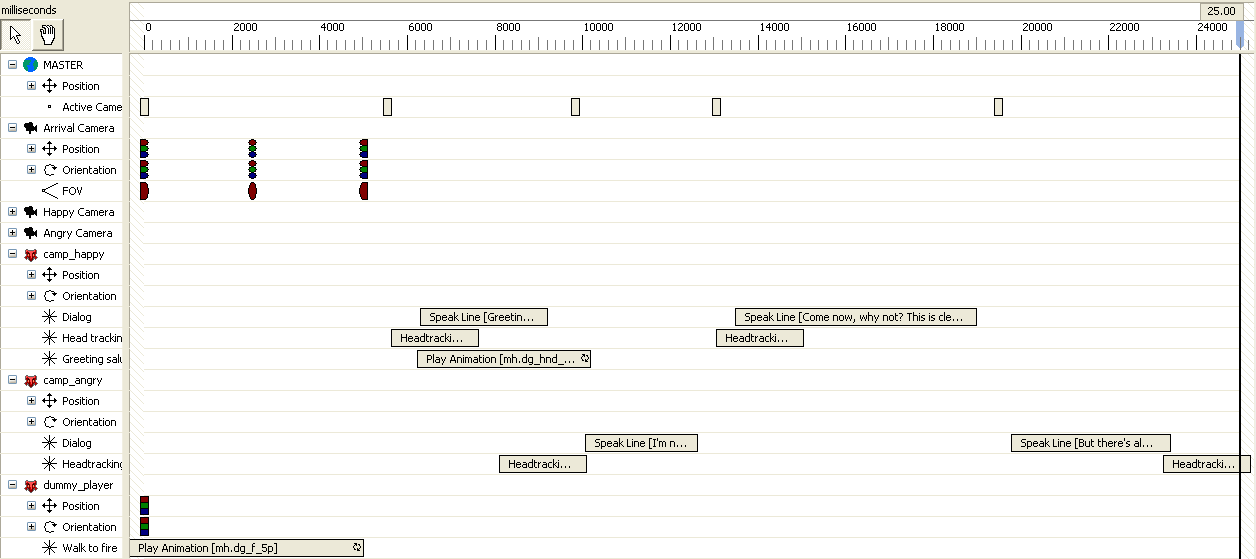
To add a little more animation to the scene, we add another track for camp_happy with an animation action (mh.dg_hnd_salute_01, a salute) to play during his spoken line. This animation is simpler to deal with than the walking animation because it doesn't displace the actor; there's no need to define position keys or worry about enabling GAD.
We'll set camp_angry's headlook so that she turns toward camp_happy while he's speaking; when we subsequently switch cameras to show her line of dialog she'll already be looking in his direction.
For camp_happy's next line, however, we'll make the headtracking change visible during his shot so the player will see how his attention has switched to camp_angry. Note that we can reuse the existing "Dialogue" and "Headtracking" tracks for this actor; we don't need to create a new track for every single action that an actor performs. So long as the durations of the actions on a track don't overlap they can coexist peacefully.
Finally, after camp_angry's last line we'll set her headtracking to look back toward the player. He's going to get the next word in when we integrate this cutscene into a conversation so this is a good way to indicate that the conversation's focus has gone to the player now.
Once we've finished crafting the cutscene we now know how long its duration needs to be. You can now go to the conversation's properties in the Object Inspector and set the cutscene's duration to the desired length.
The finished timeline of our cutscene:
Cutscene Tips and Tricks
Here are a few tips and tricks that might save the cutscene creator some time and effort:
- Head tracking is often used to look at another actor or a visible item in the cutscene. However you can further manipulate the head of the actor by having the actor look at invisible objects. You can have the actor look from one invisible object to another or move the invisible object around in the cutscene to get the actor to look at things independent of visible actors or items.
- You may find it useful to give meaningful names to your cameras if you are using more than one or two. (You might name a camera after the actor or placeable that it follows or name one camera ‘close-up’ and another ‘wide-angle’ for example.)
- If you are panning a camera around a room following a series of actors or placeables and you find that the camera suddenly decides to rotate in the other direction you can force it to stay moving in the direction you desire by adding or subtracting 360 degrees from the position/orientation you are using to move the camera.
- Feel free to experiment with animations. Try using animations that are not normally meant for your actor type, you might find some interesting or bizarre movements for your actor.
- You can put multiple actions along one track as long as they do not overlap rather than using many different tracks.
- Pay attention to what your key frames ‘transition out’ are set to when moving your cameras. Step will jump the camera from position to position while Bezier and Linear will move the camera in a smoother motion. If you are not getting the desired effect when moving cameras check what your key frames ‘transition out’ are set to.
- If you have a longer more detailed cutscene you can keep the number of cameras you use to a reasonable number by just moving one (or more) around while another camera is the ‘active’ camera.
- For testing purposes change the length of the cutscene in the cutscenes properties to a smaller value and enlarge that number as you add on to the cutscene. In this way you won’t need to wait for a long period of time for the cutscene to end.
- After placing an animation on a track you can speed up the animation by left clicking on the small circular arrows on one end and dragging it shorter or make the animation play slower by dragging the animation longer on the track.
- You can make the content of your scene seem to change by placing invisible objects in the cutsence, using an fx to obscure the view and making the object visible while the fx is playing. (For example you might have some invisible rock debris. Use a cave in fx with clouds of dust to obscure the screen. While the fx is playing make the debris visible. When the fx is finished your debris will be in place.)
- If you find that your actor is walking across surfaces (such as water for instance) when they should be following the ground you can set ‘items follow surface’ in the area that your cutscene is based on. The actor should then walk on the ground and thus wade into the water. Conversely if you want a character or placeable to not follow the surface of the ground (for instance if you want a placeable or actor to be near or on the surface of water) move the actor or placeable higher by adjusting the Z axis of the boat or actor. (An example of using a placeable partly submerged in water might be something like a boat.)
- In a cutscene you can only activate things that are unique. As in if you plopped down three identical chests in an area, when trying to activate them all in a cutscene it will not allow this and gives you a warning message. In the example above you would have to make three different chests (though they could look the same) to be able to activate them all in the cutscene.
| Language: | English • русский |
|---|
