Difference between revisions of "Conversation/ru"
m (Crate russian page (Conversation)) |
m (Перевод) |
||
| Line 7: | Line 7: | ||
|} | |} | ||
| − | + | ==Вводная информация== | |
| − | + | ||
| − | + | ||
| − | + | ||
| − | + | ||
| − | + | ||
| − | + | Диалоги содержат реплики, обычно назначенные НПС-шкам и Игроку для организации общения между ними. | |
| − | + | Каждая реплика диалога может быть ассоциирована с: | |
| + | *текстом, который будет показан в игре; | ||
| + | *озвучкой (для существ кроме Игрока); | ||
| + | *анимацией лица (синхронизация губ и мимика); | ||
| + | *{{ulink|Stage|сценой}}, располагающей участников диалога и камеры на время диалога (опционально, диалог без сцены будет использовать сцену по умолчанию, то есть "лицом к лицу"); | ||
| + | *{{ulink|Cutscene|роликом}}, который заместит реплику и покажет диалог более детально. | ||
| + | |||
| + | Диалог обычно прикрепляется к {{ulink|creature|существу}}, который обозначается в диалоге тэгом "OWNER" (собственник). | ||
| + | Иногда диалоги прикрепляются к {{ulink|placeable|размещаемым объектам}} или просто используют как контейнер для реплик, используемых при создании разных роликов. | ||
| + | |||
| + | Основным окном редактора диалогов является древообразная структура, содержащая реплики и линии действия. | ||
[[Image:Conversation tutorial 2.png]] | [[Image:Conversation tutorial 2.png]] | ||
| − | + | * красные реплики - реплики НПС, учавствующих в диалоге; | |
| + | * синие реплики - реплики Игрока; | ||
| + | * серые реплики - ссылки на другие реплики в диалоге. | ||
| − | + | Ниже приведена панель с закладками, на которой содержатся основные настройки, применяемые к каждой реплике диалога. | |
| − | == | + | == Основные настройки == |
| − | + | Панель основных настроек отображается только тогда, когда выбрана корневая реплика диалога (root). Здесь вы можете установить дефолтные настройки диалога, например, кто является Слушателем, а кто Говоруном (в диалоге с количеством участников больше двух можно будет их переназначить в отдельной реплике). | |
| − | + | Также вы можете отметить некоторые опции, определяющие анимацию в диалоге: | |
| − | * | + | * закрепить все жесты; |
| − | * | + | * закрепить все позы; |
| − | * | + | * закрепить все RoboBrad; |
| − | * | + | * закрепить все камеры; |
| − | *Ambient Soundset Type | + | * Ambient Soundset Type. |
| − | + | На закладке "Plots and scripting" можно указать действие по окончании диалога, например установить Plot-файл или запустить скрипт. Иногда данная функция позволит избежать ошибок в ситуации, когда диалог имеет очень разветвлённую структуру, но его окончание в обязательном порядке должно вызвать какое-либо событие в мире игры. | |
| − | + | Закладка "Cinematics" позволяет установить начальные настройки, которые будут наследоваться всеми подчинёнными ветками. Соответственно для каждой отдельной реплики их можно будет поменять. | |
| − | + | Ну и, конечно, на первой вкладке основной панели содержится текстовое поле, в котором можно указать краткое изложение диалога, его цели. | |
| − | == | + | == Диалог == |
[[Image:Conversation dialog.png]] | [[Image:Conversation dialog.png]] | ||
| Line 191: | Line 198: | ||
== Toolbars == | == Toolbars == | ||
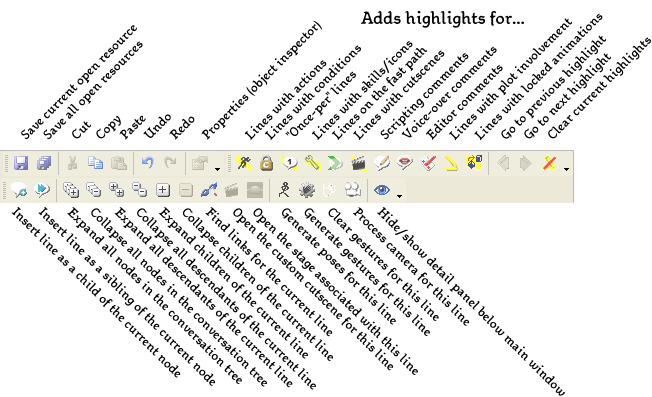
| − | [[Image:Conversation toolbar | + | {{ruspoiler|title = <font style="font-size:80%; color:red; font-weight: normal;">..... нажмите '''[show]''' для просмотра → </font> [[Image:Conversation toolbar.png]]|width = 583|content= Список кнопок панели редактора диалогов: |
| + | # Сохранить текущий открытый ресурс. | ||
| + | # Сохранить все открытые ресурсы. | ||
| + | # Вырезать выделенный текст. | ||
| + | # Копировать выделенный текст. | ||
| + | # Вставить из буфера обмена. | ||
| + | # Отмена действия. | ||
| + | # Возврат отменённого действия. | ||
| + | # Отобразить панель свойств ресурса. | ||
| + | # Отметить реплики с назначенным действием. | ||
| + | # Отметить реплики с назначенным условием. | ||
| + | # Отметить реплики, проигрываемые "один раз на ..." (диалог, игру). | ||
| + | # Отметить реплики ... (with skills/icons). {{untranslated/ru}} <!-- Нужно указать, что именно делает кнопка --> | ||
| + | # Отметить реплики ... (on the fast path). {{untranslated/ru}} <!-- Нужно указать, что именно делает кнопка --> | ||
| + | # Отметить реплики с роликами. | ||
| + | # Отметить реплики с комментариями к скрипту. | ||
| + | # Отметить реплики с комментариями по озвучке. | ||
| + | # Отметить реплики с комментариями редактора. | ||
| + | # Отметить реплики, задействующие Plot-файлы. | ||
| + | # Отметить реплики с заблокированной анимацией. | ||
| + | # Перейти к предыдующей отмеченной реплике. | ||
| + | # Перейти к следующей отмеченной реплике. | ||
| + | # Очистить текущие отметки реплик. | ||
| + | # Добавить реплику как подчинённую к выбранной на данный момент. | ||
| + | # Добавить реплику на уровне с выбранной на данный момент. | ||
| + | # Развернуть все реплики диалога. | ||
| + | # Свернуть все реплики диалога. | ||
| + | # Развернуть все реплики, подчинённые к выбранной на данный момент. | ||
| + | # Свернуть все реплики диалога, подчинённые к выбранной на данный момент. | ||
| + | # Развернуть реплику, подчинённую выбранной на данный момент. | ||
| + | # Свернуть реплику, подчинённую выбранной на данный момент. | ||
| + | # Найти реплики, ссылающиеся на выбранную на данный момент. | ||
| + | # Открыть ресурс ролика, ассоциированного с репликой, выбранной на данный момент. | ||
| + | # Открыть ресурс сцены, ассоциированной с репликой, выбранной на данный момент. | ||
| + | # Сгенерировать позы для реплики, выбранной на данный момент. | ||
| + | # Сгенерировать жесты для реплики, выбранной на данный момент. | ||
| + | # Очистить жесты для реплики, выбранной на данный момент. | ||
| + | # Расположить камеры для реплики, выбранной на данный момент. | ||
| + | # Скрыть/Показать панель деталей диалога, расположенную ниже основного окна. | ||
| + | |||
| − | + | Если вы хотите сверить с английским описанием, то откройте в новом окне этот [[Media:Conversation toolbar labeled.png|скриншот]]. | |
| − | + | }} | |
| − | + | ||
| − | + | ||
== Looping conversation and re-using lines in multiple places == | == Looping conversation and re-using lines in multiple places == | ||
Revision as of 03:24, 27 June 2013
| Диалог |
| Начало / Русская DA Builder Wiki / Поделиться ВКонтакте
|
|
Contents
- 1 Вводная информация
- 2 Основные настройки
- 3 Диалог
- 4 Plots and Scripting
- 5 Cinematics and Animation
- 6 Cutscenes
- 7 Fade In and Out
- 8 Localization and Editing
- 9 Slide Show
- 10 Toolbars
- 11 Looping conversation and re-using lines in multiple places
- 12 Voice-Over
- 13 Glossary of design terms
- 14 Associated Links
Вводная информация
Диалоги содержат реплики, обычно назначенные НПС-шкам и Игроку для организации общения между ними.
Каждая реплика диалога может быть ассоциирована с:
- текстом, который будет показан в игре;
- озвучкой (для существ кроме Игрока);
- анимацией лица (синхронизация губ и мимика);
- сценой, располагающей участников диалога и камеры на время диалога (опционально, диалог без сцены будет использовать сцену по умолчанию, то есть "лицом к лицу");
- роликом, который заместит реплику и покажет диалог более детально.
Диалог обычно прикрепляется к существу (en), который обозначается в диалоге тэгом "OWNER" (собственник). Иногда диалоги прикрепляются к размещаемым объектам (en) или просто используют как контейнер для реплик, используемых при создании разных роликов.
Основным окном редактора диалогов является древообразная структура, содержащая реплики и линии действия.

- красные реплики - реплики НПС, учавствующих в диалоге;
- синие реплики - реплики Игрока;
- серые реплики - ссылки на другие реплики в диалоге.
Ниже приведена панель с закладками, на которой содержатся основные настройки, применяемые к каждой реплике диалога.
Основные настройки
Панель основных настроек отображается только тогда, когда выбрана корневая реплика диалога (root). Здесь вы можете установить дефолтные настройки диалога, например, кто является Слушателем, а кто Говоруном (в диалоге с количеством участников больше двух можно будет их переназначить в отдельной реплике).
Также вы можете отметить некоторые опции, определяющие анимацию в диалоге:
- закрепить все жесты;
- закрепить все позы;
- закрепить все RoboBrad;
- закрепить все камеры;
- Ambient Soundset Type.
На закладке "Plots and scripting" можно указать действие по окончании диалога, например установить Plot-файл или запустить скрипт. Иногда данная функция позволит избежать ошибок в ситуации, когда диалог имеет очень разветвлённую структуру, но его окончание в обязательном порядке должно вызвать какое-либо событие в мире игры.
Закладка "Cinematics" позволяет установить начальные настройки, которые будут наследоваться всеми подчинёнными ветками. Соответственно для каждой отдельной реплики их можно будет поменять.
Ну и, конечно, на первой вкладке основной панели содержится текстовое поле, в котором можно указать краткое изложение диалога, его цели.
Диалог

This tab contains the string of text that is displayed to the player when this node in the tree is reached.
At the lower left corner are some statistics for this line and for the conversation it's a part of.
- Player Response Length Maximum: 60 characters
- NPC Response Length Maximum: 200 characters
There is also a limit of six lines of player responses displayed for any particular line of NPC dialogue. If there are more than six responses available to be shown, only the first six will be visible.
Also in the lower left corner is the string ID for this line of dialog, which is used when recording voice over audio. Don't forget to check the dialogue and creature resources back in before exporting your talk tables, or else the conversation history in the player's journal won't be correct.
Formatting tags
Emphasis tags
To indicate that a word in spoken text is emphasized, use <emp> tags. In subtitles, text inside the tags will be bolded.
For example: "I don't <emp>think</emp> so." appears in-game as: "I don't think so."
Description tags
Description <desc> tags are used in three ways: 1) To set apart a non-spoken sound (NPC lines), 2) To describe action that is not voiced (player lines), 2) To indicate that a persuade line is a lie or charm (player lines), 3) For text that describes an object (object lines).
In subtitles, text inside <desc> tags will be italicized and put into parentheses.
1) Unspoken sounds (such as a sigh, sob, or grunt of pain) - NPC lines only.
Write out the sound, not a description of the sound.
- Incorrect: "No! Please don't kill me! <desc>gurgling sound as she is stabbed</desc>
- Correct: "No! Please don't kill me! <desc>Aaargh!</desc>
"If only... <desc>sigh</desc> Alas, it cannot be." appears in-game as: "If only... (sigh)' Alas, it cannot be."
2) Persuade lines that need to be marked as "lie" or "charm" - player lines only: When a line that has been flagged in the toolset as a "Persuade" line needs to me marked as a specific "lie" or "charm", write Lie or Charm at the line's beginning. Then, use <desc> tags around that word so that it will be set off from the rest of the line. For example: <desc>Lie</desc> "Of course I didn't report you to the authorities." appears in-game as: "(Lie) Of course I didn't report you to the authorities."
3) Text that describes an object - Object lines only: When a line is created to describe an inanimate object, such as a bookcase or chest, descriptive lines for that object should be marked with <desc> tags. The writer creates a "character" in the toolset ("bhm700_bookcase"), and writes a line to describe that object. For example, <desc>This bookcase is full of dusty, moldering books.</desc> or <desc>The phylactery is warm to the touch and filled with a small amount of viscous, red liquid. You see no way to open it.</desc>
- Correct: <desc>This bookcase is full of dusty, moldering books.</desc>
All such text should be written in third-person, present tense, with the player always referred to as "you".
- Incorrect: <desc> The phylactery is warm to the touch and filled with a small amount of viscous, red liquid. I can't see any way to open it.</desc>
- Correct: <desc>The phylactery is warm to the touch and filled with a small amount of viscous, red liquid. You see no way to open it.</desc>
The tech designer will need to create a placeable in the appropriate area. The character for that placeable should be set as "null". (This indicates that no VO recording is needed for that line.) It should also be set to appear on the screen even if subtitles are turned off by default.
Action Tags
Action tags <act> describe player action. In subtitles, text inside <act> tags will be italicized and put into parentheses.
For example: "If that's the way you want it. <act>Kill the soldier.</act>" appears in-game as: "If that's the way you want it. (Kill the soldier.)"
- Incorrect: {Owner}: "Here. Take this. <act> Opens chest, removes sword.</act> It was your father's."
Macros
The <FirstName/> macro will be replaced with the first name entered by the player for his character. Since the player character's name can be anywhere up to 20 characters long, player lines using the <FirstName/> macro can only have 40 characters (not including the macro itself).
Macros are used fairly rarely in Dragon Age since voiceovers accompany most lines and cannot be modified to match lines with variable text.
Other settings
Also on this tab are some additional flags and tags that can be set for this line.
- Skill/Icon - allows an icon to be placed next to this line indicating that a skill must be used when the line is selected by the player
- Speaker Tag and Listener Tag - defines which character is the speaker and which is the listener (can be set to default)
- Language - defines which language the line is spoken in.
- Fast Path - Any line with "Fast Path" set will be the first option presented to a player when they reach this conversation node. This can be useful if you want to provide an easy way to blow through the conversation tree without having to read it; if you mark the shortest path through the tree with this flag the player will only have to tap the "1" key to pass through it. You can also do this without the fast path flag by arranging your conversation nodes in the correct order, but restructuring an entire conversation tree for this purpose is a more complex task.
Plots and Scripting
See conversation plots and scripting for details on how to use plots and scripts to make certain lines of dialog "conditional" (appearing or not appearing based on conditions in the game) and how to have certain lines cause scripted actions and change plot flags.
This tab also includes an option to easily set a line so that it appears to a player only once (either once per conversation or once per game).
Cinematics and Animation
See conversation cinematics and animation for details of how to control the performance of your virtual actors. Conversations without cinematic direction set for them will use a default over-the-shoulder camera style that's serviceable for most conversations, but which might become dull when used for all of them. Adding some animation and varying the camera angles can go a long way to spicing up a conversation, and for special events you can add much more than that - even integrating full-blown cutscenes into the middle of a conversation.
Cutscenes
Even more control over how a conversation appears can be achieved by turning it into a cutscene.
There are two ways of doing this.
Cutscene-centred approach
See Cutscene tutorial for a method of building one cutscene from many conversation lines (the entire conversation, perhaps).
This may be useful if the conversation is essentially action-packed and linear.
Because the cutscene is in control, the conversation logic is ignored.
So this approach is less useful when there are player options, conditions and/or actions.
Also, the conversation isn't logged.
It is possible to run a plot script and/or regular conversation at the end of the cutscene (either via the End Script property or CS_LoadCutscene).
Conversation-centred approach
If conversation options, conditions, actions or logging are important, it's better to put the conversation in control.
This may also be the easiest option if only one or two lines require the enhanced control afforded by a cutscene.
Once a stage has been specified for the conversation, you can make one cutscene for each NPC line, using the "Convert Line to Cutscene" option on the Edit menu.
By default, the cutscenes are collected in one folder per conversation, for convenience.
In this approach, the conversation works normally, except that the cutscenes provide enhanced cinematics for the lines in question.
Fade In and Out
A conversation can fade in or out by converting the line to a cutscene.
It's not necessary to master the full complexity of the cutscene editor to do this.
 Right-click Master.
 Add Track.
 Right-click the new track.
 Add effect Fade In or Out (default duration of fade is 60 frames i.e. 2 seconds).
 Click anywhere that's not a track to view the cutscene properties in Object Inspector.
 The cutscene length is initially the dialogue duration (in frames).
 Change this to (dialogue duration + 30x + 60) where x is the time the screen will be completely black in seconds.
 Adjust start/end time of the new track (and the Speak Line track under OWNER, if fading in).
For fade out, Speak Line happens first, then fade. The additional duration of the cutscene ensures the screen remains black for x seconds.
For fade in, assuming the screen is already black, fade after 30x frames, then Speak Line after 30x + 60 frames.
Localization and Editing
These two panels are used for keeping track of the status of the localization and editing process for this line. This is useful for large-scale collaborative projects, such as Dragon Age itself, but may not be of as much use for individual adventure designers.
Slide Show
The Slide Show tab is used to produce a simple form of "cutscene" that consists of one or more pre-rendered still images. For example, the official DAO campaign ends with a slideshow that describes the aftermath.
Images used in a slide show can be in TGA, TPC or DDS format.
Each image must be on its own NPC conversation line. The Dialogue text isn't used in game, but it must contain something (e.g. "Slideshow"), otherwise the slide won't appear.
As usual, the NPC lines are connected by player lines (which don't need any Dialogue text).
See BeginSlideshow for the script function that triggers a slideshow.
Toolbars
..... нажмите [show] для просмотра →
 |
|---|
Список кнопок панели редактора диалогов:
|
Looping conversation and re-using lines in multiple places
Although the basic structure is tree-shaped, the flow of the conversation can be structured to return back to previous nodes in the conversation. To cause a node in the tree to repeat:
- select the node you want to return to,
- "Copy" it (control-C, or select copy from the right-click menu),
- select the node you want the repeated response to be a child of,
- select "Paste as link" from the right-click menu (keyboard shortcut: control-shift-V)
The link node will appear in gray and cannot be edited. If you edit the original copy of the node all linked copies will reflect the change. You can only link nodes that have the same type (player/non-player), the paste-as-link option won't be available if the node currently saved to the clipboard can't be linked to a child of the currently selected node.
To find the original copy of a linked node, right-click on the grey node and select "Jump to Target".
Using the "once per conversation" or "once per game" visibility setting for the children of a repeating node is useful for preventing the player from cycling multiple times through the exact same dialogue.
Voice-Over
You can use both placeholder and real recorded voiceover in your conversation, depending on what your current status on the conversation is. After you have some sort of voiceover associated to your conversation, you may run "Tools->Generate FaceFX" to add a facial expression to the NPCs performance.
All information about Voice-Over (conventions, integration, etc.) is stored at a another page to keep a central organized structure.
Glossary of design terms
- Branch: A dialogue option that adds flavor to a conversation, but doesn't change the direction of the plot or story. Branches always come back together at a choke point.
- Clarification Hub: This allows a player to return to an NPC and clarify plot elements, get directions, or find out information about the current area. Generally, an single NPC line asks the player what he wants; a list of questions is then available to the player. Once the player has received an answer, the same list reappears (minus the question just asked). The player can loop infinitely through this NPC dialogue.
- Path: The dialogue options players can select that change the direction of a plot or story. For example, when a player is given the option of accepting a quest, there are two different resulting paths (based on a "Yes" or "No" answer). Unlike branches, paths never come back together. Each path has a different ending condition.
- Question Hub: A list of questions presented to a player that allows him to ask multiple questions to clarify information he's just learned. After a response is given, the player can ask the remaining questions. It's possible to loop indefinitely through a question hub, but only by asking non-critical questions. Unlike a clarification hub, at least one question drives the conversation tree forward and eliminates all remaining questions. For example, an NPC gives plot critical information; once she relates the details, the player can ask four specific questions. Three of the questions are non-critical: they give flavor and/or enhance role-playing. These questions allow for infinite looping. However, the fourth question drives the conversation forward and eliminates all other questions. This important question should always be located beneath the "lesser" questions.